Copyright © 2010 Bytemark Computer Consulting Ltd.
Permission is granted to copy, distribute and/or modify this documentation under the terms of the GNU Free Documentation Licence, Version 1.3 or any later version published by the Free Software Foundation; with no Invariant Sections, no Front-Cover Texts, and no Back-Cover Texts. A copy of the licence is included in Appendix B, GNU Free Documentation License.
2010
| Revision History | ||
|---|---|---|
| Revision 0.1 | 2009-11-12 | PJC |
| Initial release. | ||
| Revision 0.2 | 2010-04-26 | SKX |
| Renamed the project, and updated the documentation to match. | ||
- Preface
- I. User guide
- 1. The Bytemark Symbiosis system
- 2. Connecting to your server with FileZilla and SFTP
- 3. Website setup
- 4. Configuring email
- 5. Setting up FTP Access
- 6. Managing the MySQL database
- 7. Scheduled tasks
- 8. Automated backups
- 9. Keeping Your System Secure
- 10. Connecting to your server via SSH
- 11. Configuring SSL Hosting
- II. Reference
- 12. Website Configuration
- 13. Email Configuration
- 14. Firewall Reference
- 14.1. Files & directories which the firewall uses
- 14.2. Blocking abusive remote hosts
- 14.3. Disabling the blacklist functionality
- 14.4. Whitelisting "known-good" IP addresses
- 14.5. Allowing web applications to make remote connections
- 14.6. Making custom additions to your firewall
- 14.7. Disabling the firewall
- 15. DNS Hosting
- 16. Scheduled tasks
- 17. Database configuration
- 18. Backup Reference
- 19. Symbiosis Service Monitoring
- III. Support Guide
- IV. Appendicies
- Glossary
- Bibliography
- Index
The Bytemark Symbiosis system makes it easy to manage website and email hosting without much prior technical knowledge. After installing a connection program, setting up a website or an email account is as easy as creating folders and files on your hard drive.
The system is based on the stable version of Debian GNU/Linux, with a few light touches here and there to make things easier to use.
We have written a comprehensive user guide to help people get started with their Symbiosis install.
The complete specification is documented in the reference guide.
Symbiosis is a system that helps in the day to day tasks involved in administration of a typical web and email server. Its goal is to simplify running web and email hosting across multiple, separate domains, along with all their associated services.
Specifically, Symbiosis handles
- Web server configuration, including uploading content via FTP,
- DNS hosting using the Bytemark content DNS system,
- Email server configuration, including web mail,
- Database access,
- Automatic daily backups which are synchronised to your Bytemark backup space, and
- A firewall and the automatic installation of security updates.
Symbiosis is supported on any platform that is capable of running Debian GNU/Linux.
No. All typical day-to-day jobs, such as adding new web sites, or email addresses, or uploading content, can be done using SFTP, i.e. FTP over SSH, by creating files and directories. FileZilla is the recommended program for this.
This should not be viewed as a disadvantage; any confident computer user should be able to manage a Symbiosis system with the help of this documentation and the cost and security concerns of panel based systems are avoided altogether.
Unlike other control-panel systems, one of the aims of the Symbiosis system is to keep configurations for the various services as close to the Debian default as possible. This allows users to tailor these configurations as they need.
Although it is possible to access a Symbiosis system comand line as root (the equivalent of administrator on a Windows system), that is not recommended. Where it is necessary to run commands with root privileges, that should be done by prefacing them with sudo and supplying the admin password when prompted to do so. Most operations on a Symbiosis system must in any case be done by admin (or another limited user), not by root.
Yes! Symbiosis is released under the GNU General Public Licence, version 2 or later. All the source code is available for scrutiny on the Symbiosis project site. There is also a issue tracker to report any problems encountered, or to request improvements.
This documentation is released under the GNU Free Documentation Licence or later. It also has a project site, and issue tracker.
Symbiosis uses the following software, all of which is open-source:
- Apache 2.2 web server,
- Exim 4 mail transport agent,
- Dovecot 1.0 IMAP and POP3 server,
- MySQL 5.0 database server,
PHP 5 scripting language, with the following modules
- mysql,
- curl,
- imagemagick,
- mcrypt,
- mhash,
- xmlrpc,
- gd,
- SpamAssassin spam filtering, and ClamAV anti-virus,
- Pure-FTPd FTP server,
- SquirrelMail webmail program
What follows is step by step instructions to get up and running with controlling your server and setting up core services. The screen shots are taken from a Windows system, but all the programs used are also available for Mac OS X and GNU/Linux desktop systems.
Throughout the documentation, the example server used is example.vm.bytemark.co.uk. The example domain used is my-brilliant-site.com. These should be substituted as appropriate.
Before you start this chapter
- Install FileZilla on your computer; it is freely available from its project website for Windows, Mac OS X, and GNU/Linux.
In this chapter you’ll learn how to connect to your server ready to transfer files using the FileZilla program. It has been assumed that you have a working copy of this program installed on your desktop computer.
A server installed with Symbiosis will be running SSH, and will have had the admin user account created. This allows you to connect via SFTP to administer the machine.
The admin account should be used when administering a Symbiosis system to ensure that files and directories have the correctcode-sign.co.uk permissions.
Usage of SFTP is mandated for administrating the machine, as all data are passed over the network encrypted.
Throughout the documentation the example server name example.vm.bytemark.co.uk should be substituted for your own server name.
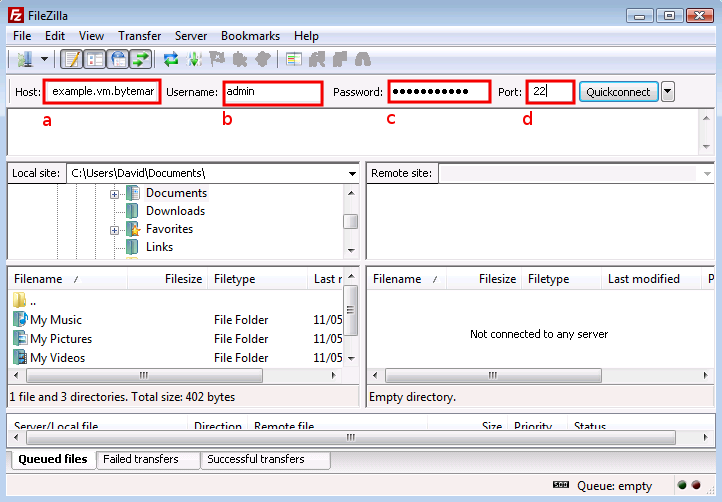
Start FileZilla and enter the details in the text fields below the program’s toolbar. The name of your server goes in the text field a and admin in the field b.
Complete the connection details by filling in the field c with the password for the admin user, and the standard SSH port number, 22 in the field d.
Click the button a to the right of the text fields; the first time you do this you’ll get a warning message that is safe to ignore, so check it’s box b and click the button c.
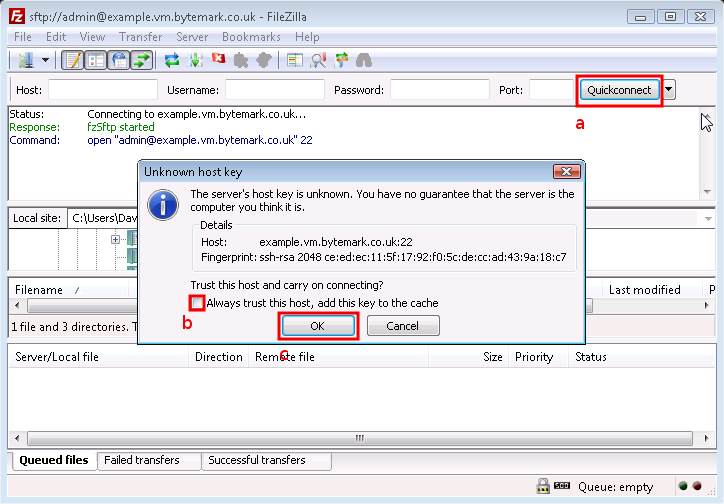
In the text area immediately below the you’ll see messages scroll by as the connection to the server is made.
Tip
You won’t need to enter those details each time you connect. Click the small button to the right of the button to reveal the as a history item. In future simply select that link.
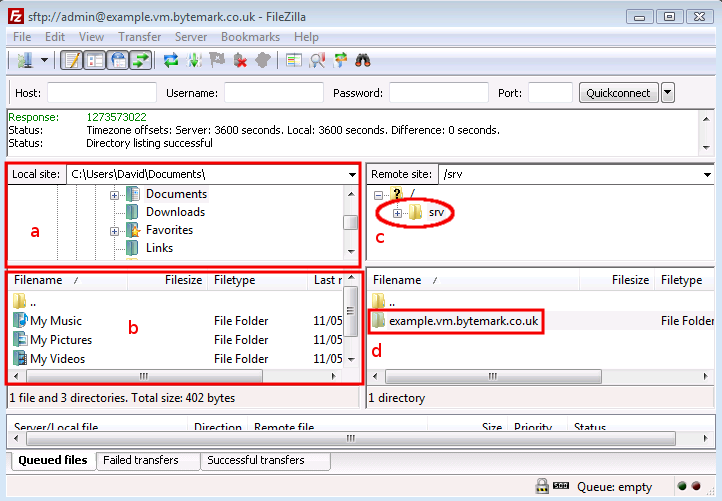
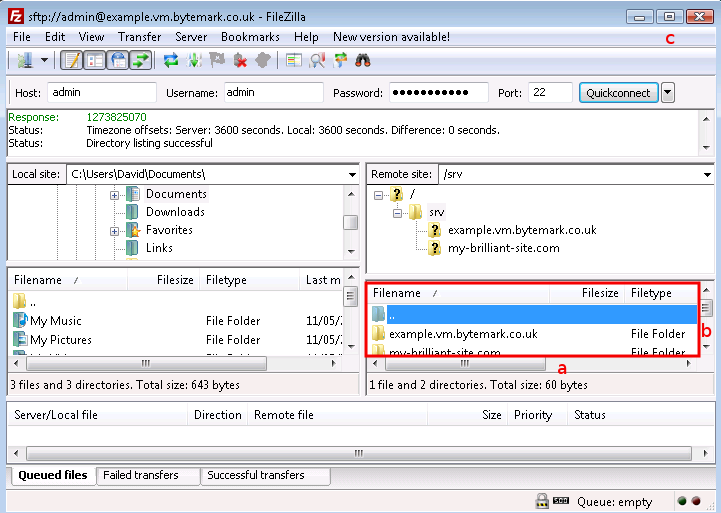
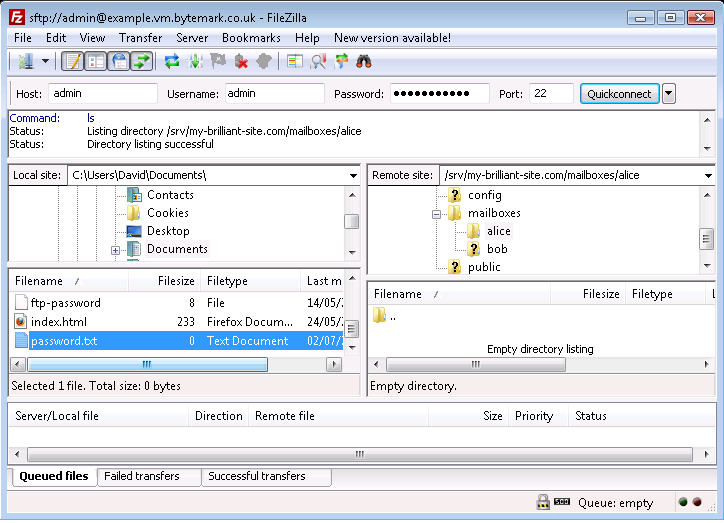
The following figure shows FileZilla’s layout after successfully
logging in. The display is divided into four main sections, the
top left pane shows a directory tree, with the directories on your
local computer, labelled a. Beneath that is a listing showing the
contents of the currently selected local directory, labelled b.
Then the top right pane shows the directory tree of the remote
machine. When logging in as admin this will show /srv
(c). Finally beneath that is the contents of that directory.
Initially this will only contain one directory named after the
machine. In this case example.vm.bytemark.co.uk/ is
shown (d).
Once you’ve been able to successfully connect to your server, via FileZilla, you may proceed to configure email, or setup your website.
This section demonstrates how to carry out some common tasks with the FileZilla client:
To open the
/srvdirectory on the server, click the icon.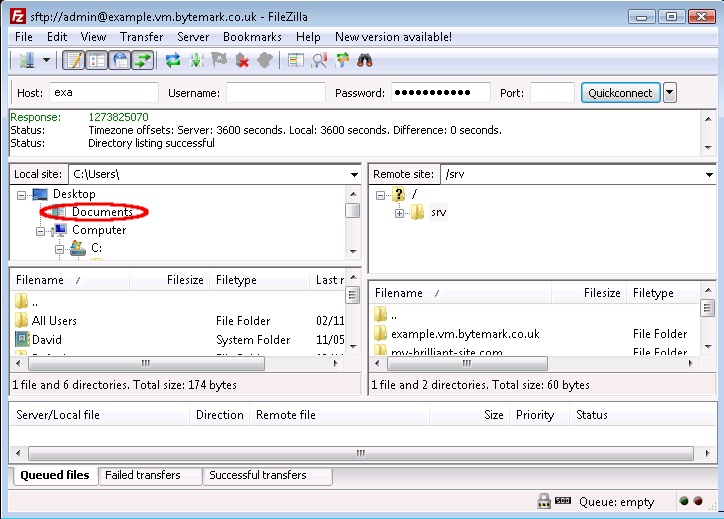
Notice that the folders that appear in the tree display are already displayed in the window. You can use the a and b to adjust the view; as in any desktop window you can also use the c to expand the Filezilla display to full screen or just drag it’s corners in the usual way.
When you click on the label (not the directory ), the control appears. The contents of the directory are already displayed in the window.
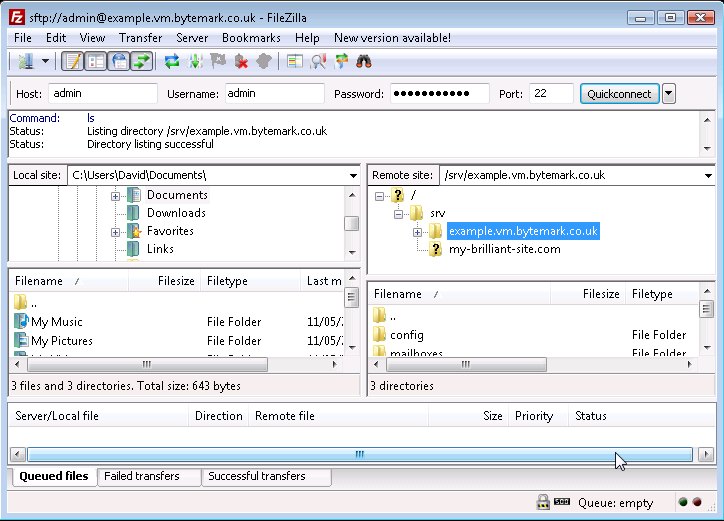
Click the control to see those contents as part of a tree view and notice that you now have a control, which could be used to close this detail of the file system structure.
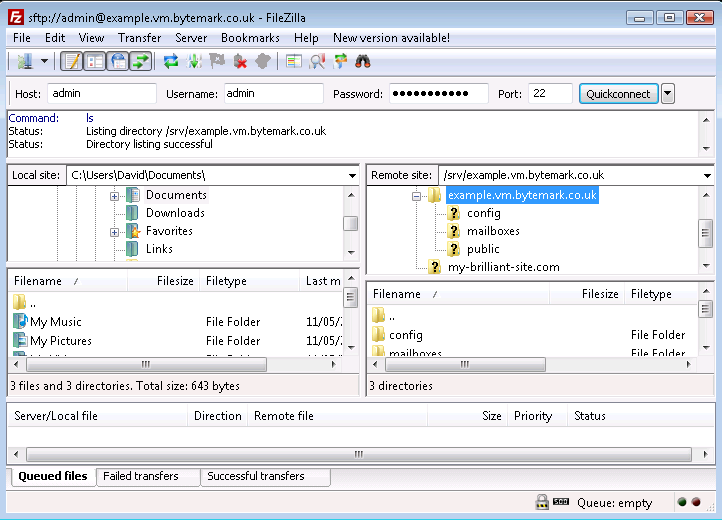
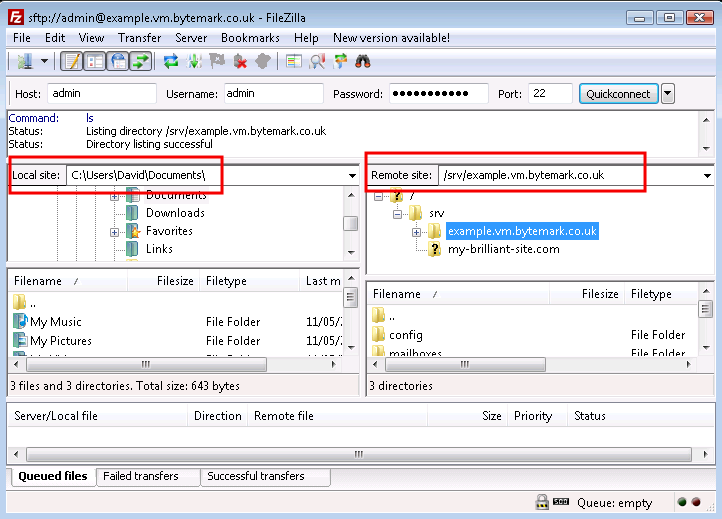
Those operations were all carried out on the right side of the screen where the , in this case the server example.vm, is represented. Comparable operations can be carried out on the left side of the screen, where the . represents the file system on the desktop machine.
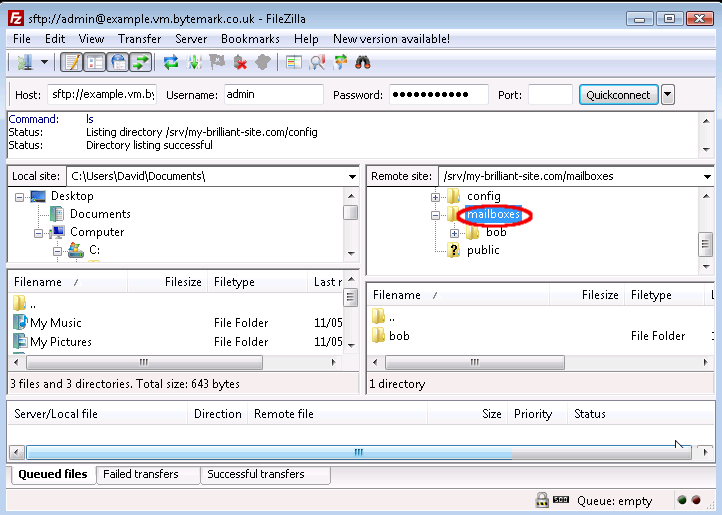
In this walkthrough, a mailbox will created for a user alice. That is done
by creating a directory under the /srv/my-brilliant-site.com/mailboxes directory. (The configuration of email is described fully in Chapter 4, Configuring email.)
Highlight the parent directory by pointing at the label (not the icon) and left-clicking.
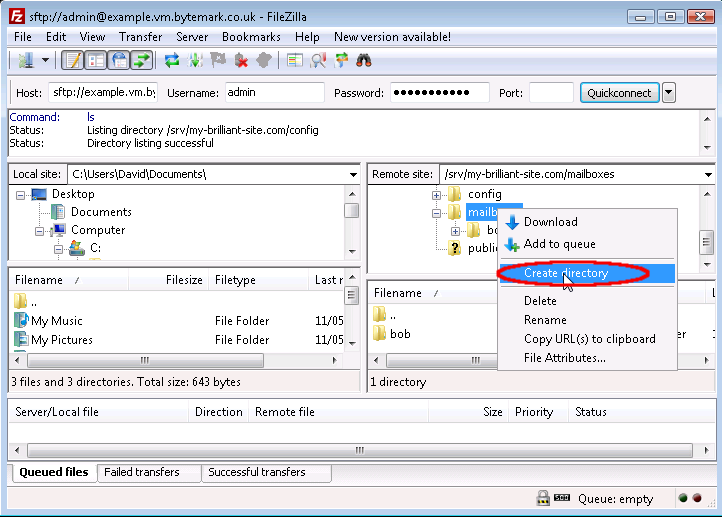
Right click to bring up the menu and select .
The starts; the default path
/srv/my-brilliant-site.com/mailboxes. is as we want it, but not the default nameNew directory.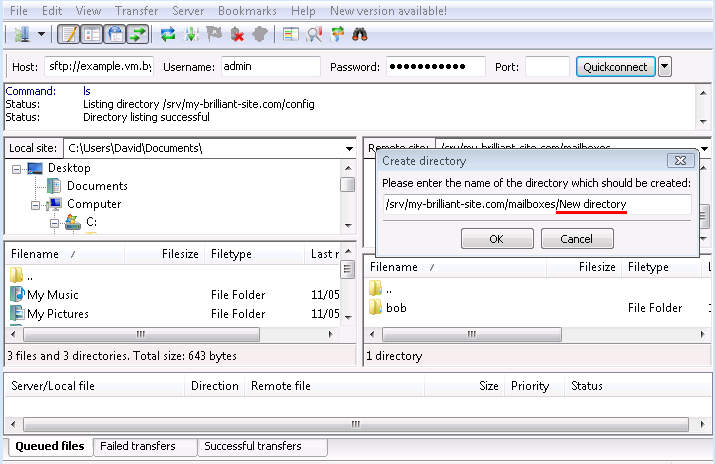
Edit that, replacing
New directorywithalice, then click the button.
The
/srv/my-brilliant-site.com/mailboxes/alicehas been created.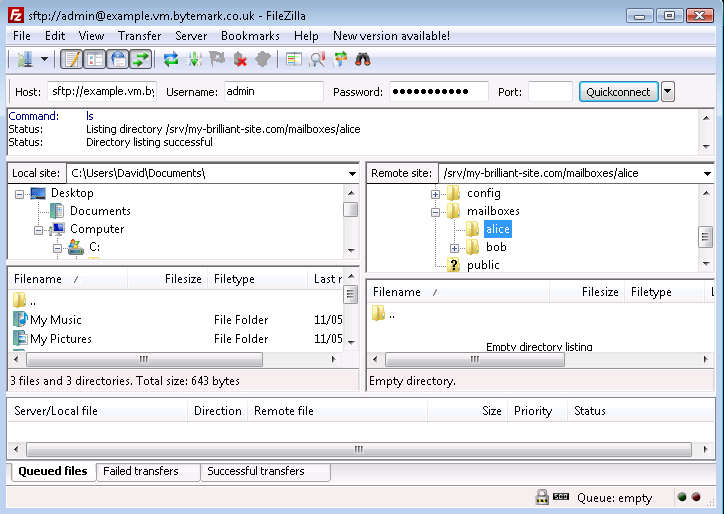
Unfortunately creating a file upon the remote server cannot be completed directly within Filezilla, but that limitation can be skirted around by creating the file on your local machine and then uploading it to the correct location on the server.
Note
Windows desktop systems tend to silently add the .txt extension when you create a plain text file; that makes necessary the additional step of renaming the file.
This walkthrough demonstrates the procedure for allowing the user alice to logon to the mailbox at the my-brilliant-site.com domain; in doing so, it covers the creation, upload and rename operations.
The Notepad program has been used to create a plain text document that contains a secure password on a single line. Although the name "password" was specified as the filename, Filezilla reveals that the ".txt" extension has been silently added to that.
Right click on the
passwordfile to bring up the menu and select the option.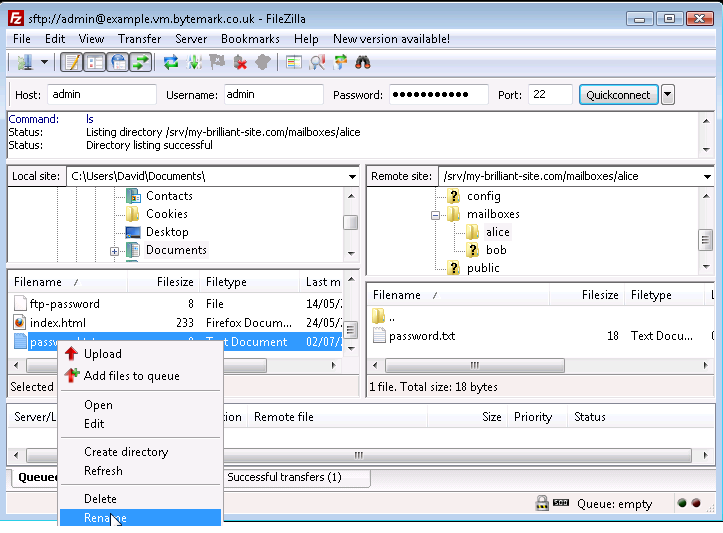
Rename the file by removing the unwanted .txt extension.
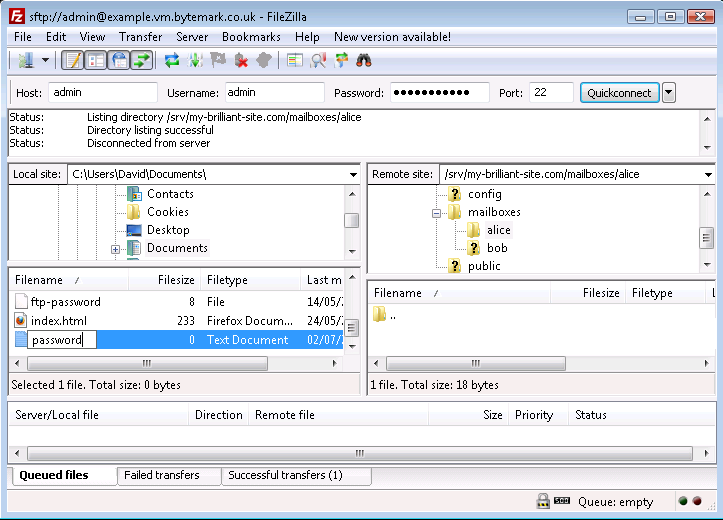
Press your Enter key to complete that; the file has been renamed from
password.txttopassword. Move to the area on the right side of the Filezilla display and navigate to the/srv/my-brilliant-site.com/mailboxes/alicedirectory
Moving back to the left side of the Filezilla display, again highlight the
passwordfile and right click to bring up the menu. This time select the option.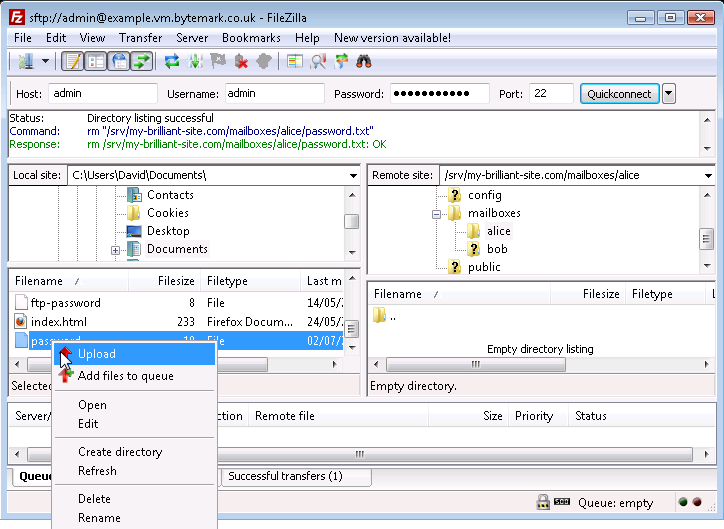
The
passwordfile has been created on the server in effect, by uploading it from the local desktop machine. An alternative method of achieving this is to select the file and in the local area and drag it to the area of the server.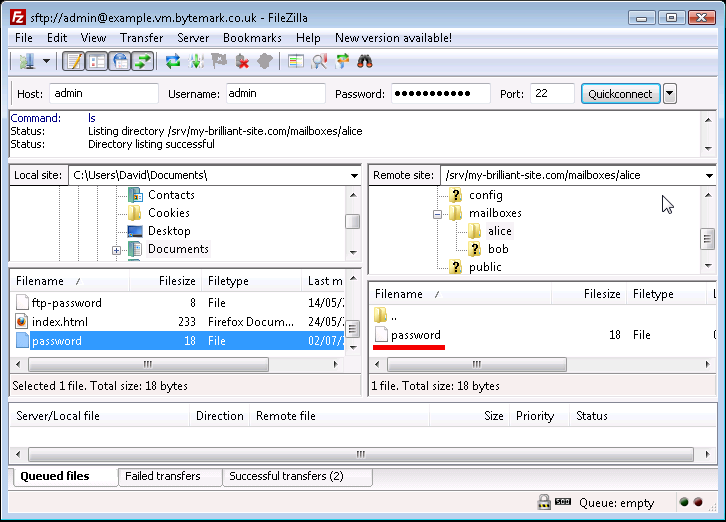
The
passwordfile on the local machine is no longer needed; select and right click then choose the option.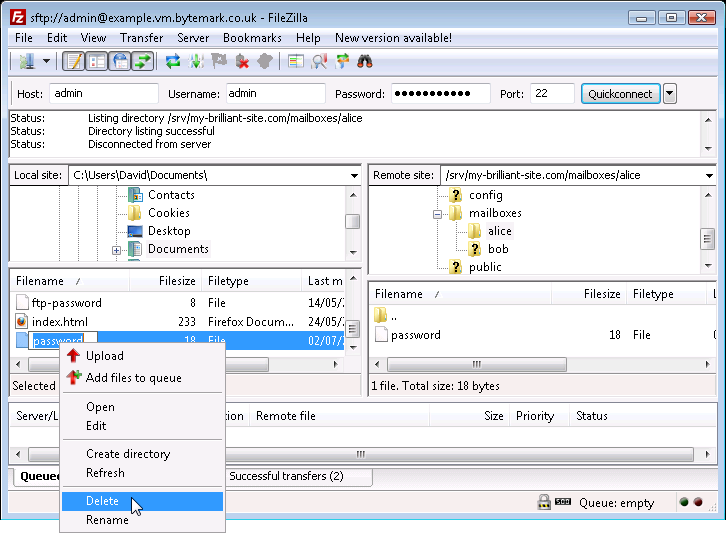
Confirm that you do want to delete the file by pressing the button in the dialog.
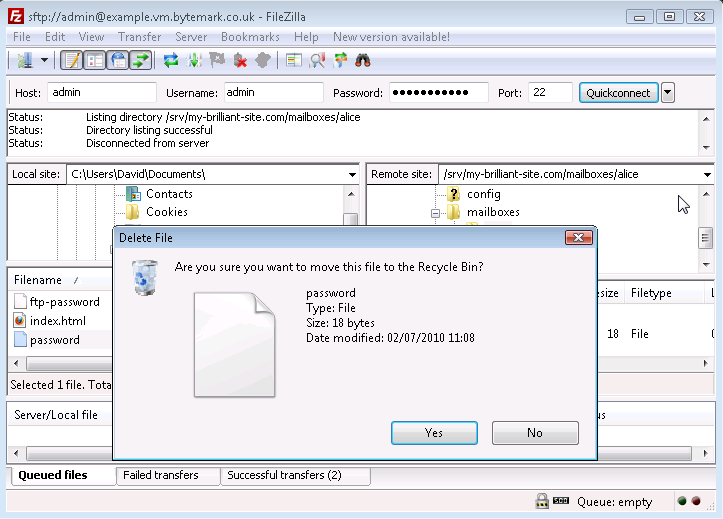
The local
passwordfile has been deleted. In the same way files and also directories can be deleted from the server, the only diffence being that the dialog that comes up is less detailed than the local dialog. Below is what would be seen if user alice was to be removed; thealicedirectory and the option have been selected.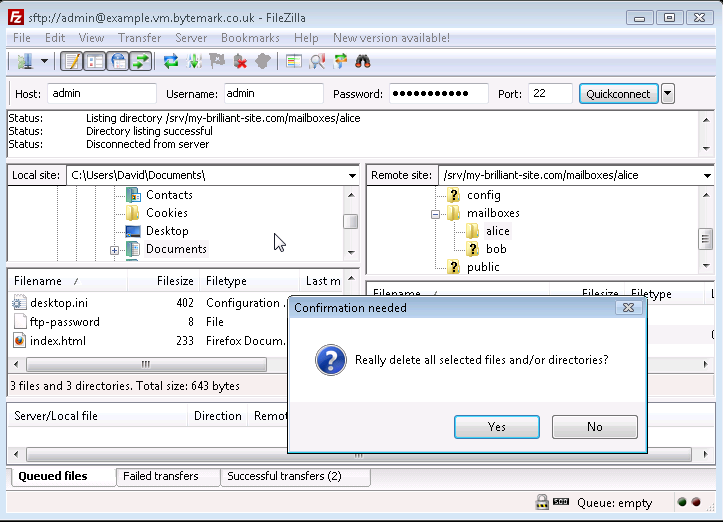
The button in the dialog was selected and the
alicedirectory has been removed.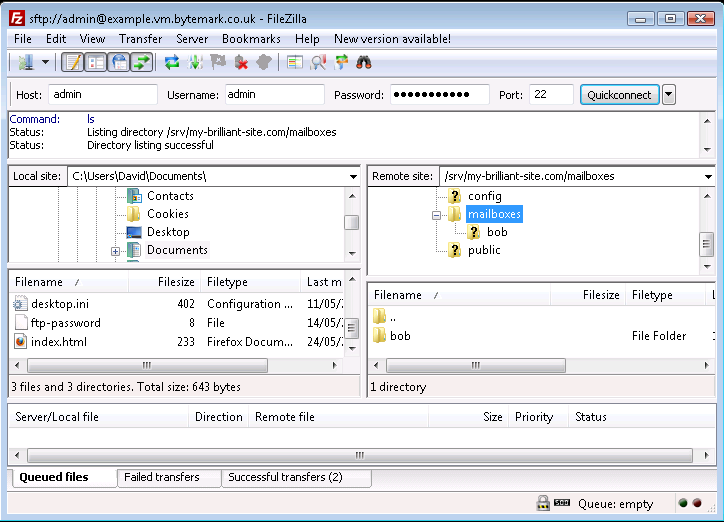
Before you start this chapter
- Connect to your server over SFTP using FileZilla (see Chapter 2, Connecting to your server with FileZilla and SFTP).
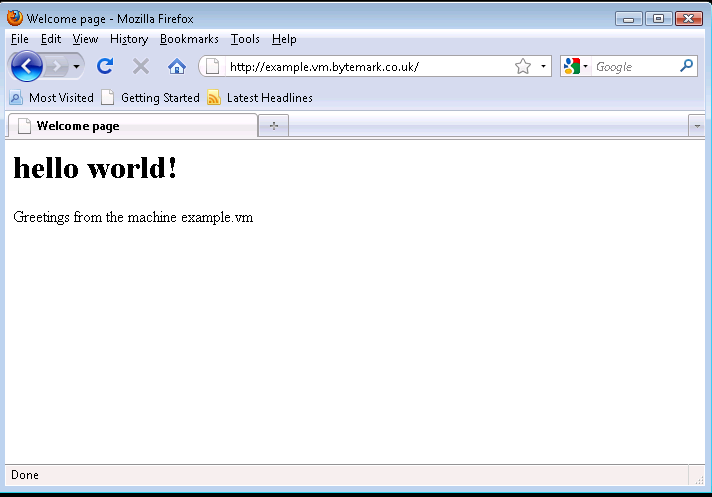
Start up your web browser and enter the machine’s name in the location bar, e.g. http://example.vm.bytemark.co.uk. As you can see, your machine is already hosting a default page.
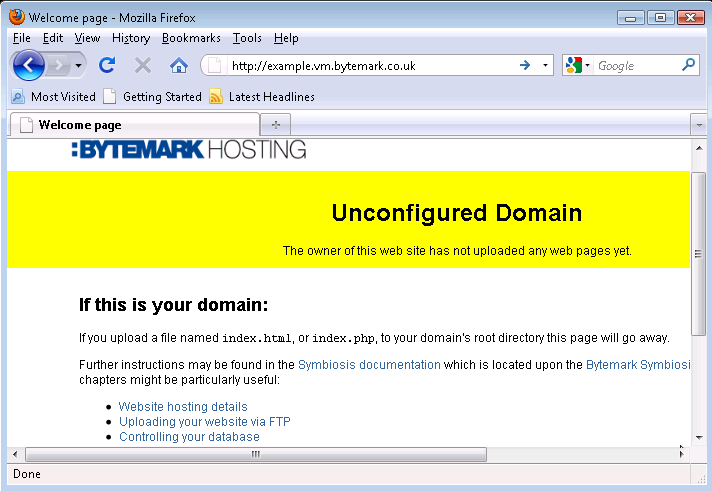
The procedure for replacing this default page with a new one is as follows.
Create a simple HTML file named
index.html. It has been assumed that it has been saved in the directory calledMy Documents.Start up FileZilla and connect to your server.
The file
index.htmlshould show up in the lower left-hand pane. In the right-hand pane the/srvdirectory will be shown.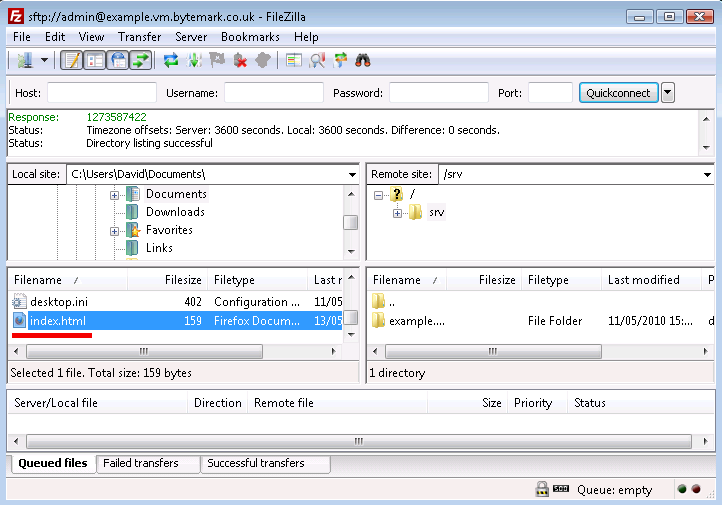
HTML files should be uploaded to the
public/htdocs/directory. This can be found by revealing the contents ofsrv/by clicking the to its left in the top-right hand pane.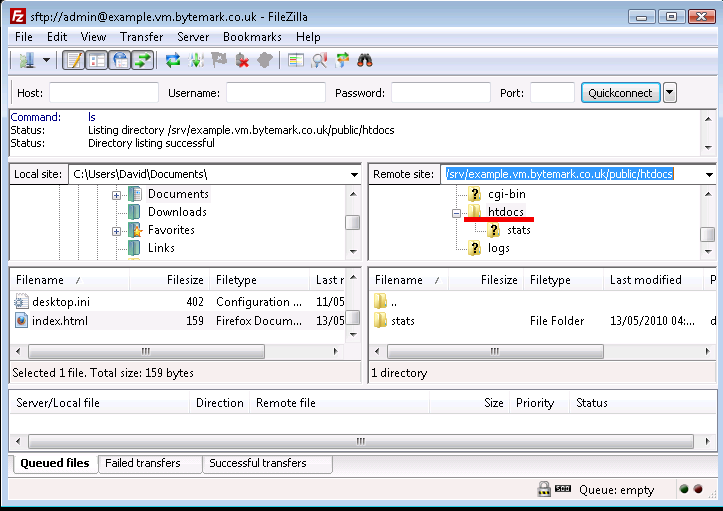
Now right-click on
index.htmlin the lower left-hand pane, and select from the menu. The file is uploaded to thehtdocs/directory on the server.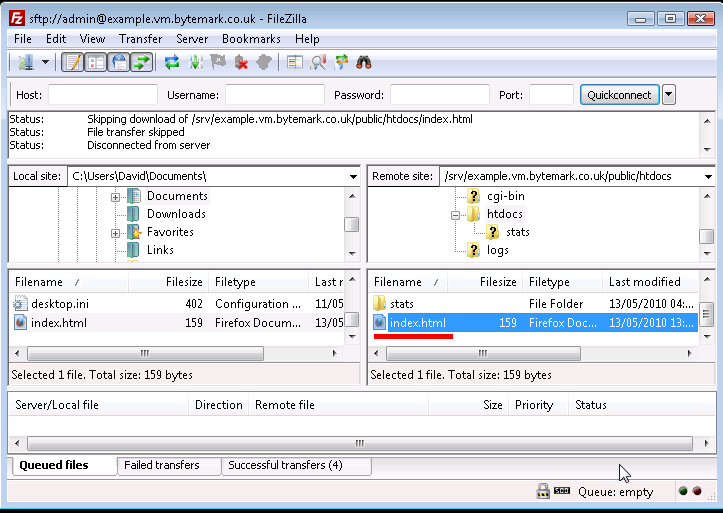
Refresh your web browser to see the result.
Note
This example shows uploading a web page written in HTML, called
index.html. This file could also be written in PHP,
in which case the file should be called index.php.
The previous section dealt with setting up a web page using the default domain associated with the machine. A Symbiosis system can host many domains without any extra configuration. This section deals with configuring a second domain.
It has been assumed that both your server is hosted at Bytemark, and that this second domain is using the Bytemark name servers. If this is not the case, then Section 15.1, “Default DNS records” sets out the DNS records needed for the following procedure to work.
For the purposes of this tutorial, the domain my-brilliant-site.com is being hosted on the machine example.vm.bytemark.co.uk.
With FileZilla connected to the server, make sure the text field is pointed at the
/srvdirectory a. Right click on the folder icon b.From the right-click menu select and in the popup enter
/srv/my-brilliant-site.com.
Click the button c to create the directory
Repeat this step to complete the domain tree with the directories
/srv/my-brilliant-site.com/publicand/srv/my-brilliant-site.com/public/htdocsCreate another
index.htmlfile.Upload it as before, but this time into the
htdocsdirectory in themy-brilliant-site.comdirectory tree.
Within a hour, the DNS records for my-brilliant-site.com will be generated and uploaded to the Bytemark domain name servers. Navigating to that site will then show our new index page.
At this point, the site will also be visible at both http://my-brilliant-site.com and http://www.my-brilliant-site.com. This is part of the Symbiosis setup; if different pages were required at www.my-brilliant-site.com, a separate directory tree should be created for www.my-brilliant-site.com, with a different content as needed.
As we’ve previously noted if there is a directory present upon
your machine with the name /srv/my-brilliant-site.com/public/htdocs
the contents of that directory will be served for both:
This works because although the prefix, "www.", is missing the
actual domain is still found on your machine beneath the /srv prefix.
In the general case you can also direct your users to:
In short - the sub-domain used as a prefix is silently removed if the appropriate directory cannot be found upon your machine. The only additional step you’ll need to perform is to create the appropriate DNS entry, which is discussed in Section 15.2, “Adding a wild-card hostname record”.
It is possible to test the content associated with a new domain before it has been registered or had any DNS configuration done. This is done using the testing prefix.
If your machine is not hosted at Bytemark, or your machine name does not end in bytemark.co.uk then a wild-card DNS record is needed for this to work. This is discussed in Section 15.2, “Adding a wild-card hostname record”.
For example, to view the site my-brilliant-site.com which is hosted on the machine example.vm.bytemark.co.uk, simply head to http://my-brilliant-site.com.testing.example.vm.bytemark.co.uk/.
This testing URL is immediately available following the upload of the
index.html or index.php files.
Note that there is no www at the start of the testing URL.
Note
This facility does not play well with certain directives that can be used
in Apache htaccess files, especially rewrite rules.
Before you start this chapter
- Connect to your server via SFTP (see Chapter 2, Connecting to your server with FileZilla and SFTP).
This chapter deals with configuring email for a domain, namely setting up mailboxes to receive email. The Symbiosis system makes this very simple, as the process of creating a new mailbox, or email account, is a simple matter of creating a few files and directories.
As with our previous examples we’ll be using the my-brilliant-site.com domain for demonstration purposes, but you should substitute your own domain.
Again for example purposes we’ll be demonstrating the creation of a new email account, for the user "bob", which will correspond to the email address bob@my-brilliant-site.com - you should change the name "bob" to the username(s) you desire.
It has been assumed that the first few steps in Section 3.1, “Hosting a web page using your own domain” have
been followed, i.e. that a directory has been created under
/srv/ for the domain my-brilliant-site.com.
Start FileZilla and connect to your machine.
Then right click on the
/srv/my-brilliant-site.com/directory and select from the menu. Set the new directory name to bemailboxesand press the button.Repeat this step to create the directory
mailboxes/bobwhich makes a mailbox for the address bob@my-brilliant-site.com.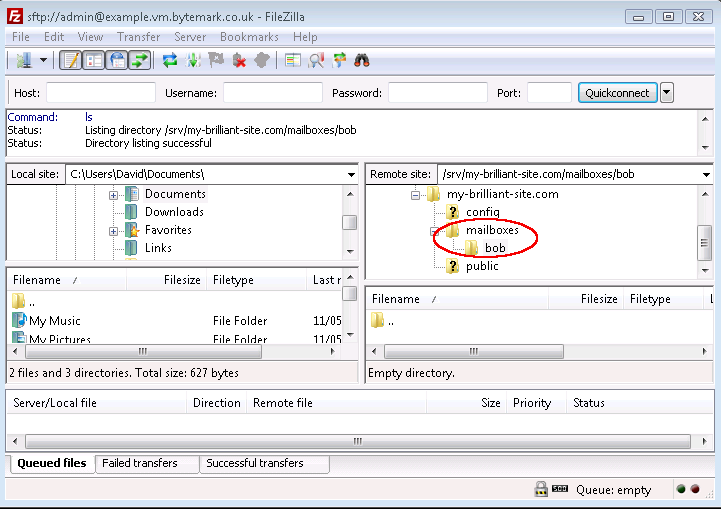
Use a text editor such as Notepad to create a file
passwordon your desktop machine which contains a secure password.Under Windows a
.txtextension will be added to the filename which is not wanted. So before you upload the file use FileZilla to rename it frompassword.txttopassword. That is done by clicking with the right mouse button on the file in the lower right hand pane, and selecting from the menu that appears.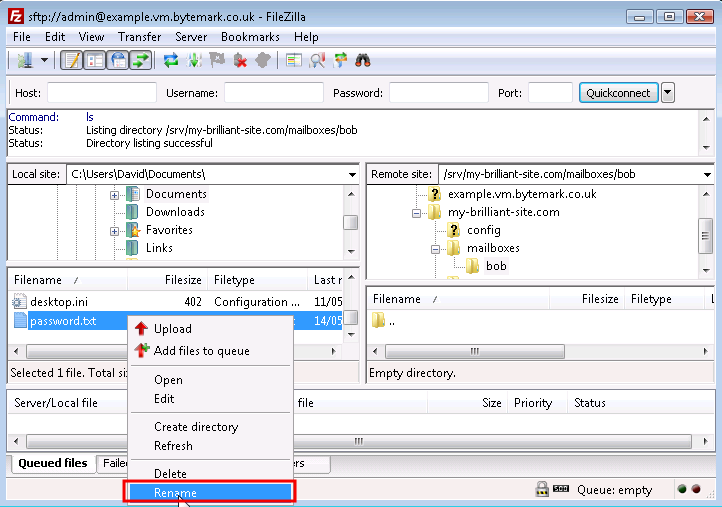
To upload, right click on the filename and select from the menu, making sure that the directory
/srv/my-brilliant-site.com/mailboxes/bob/is shown in the text area.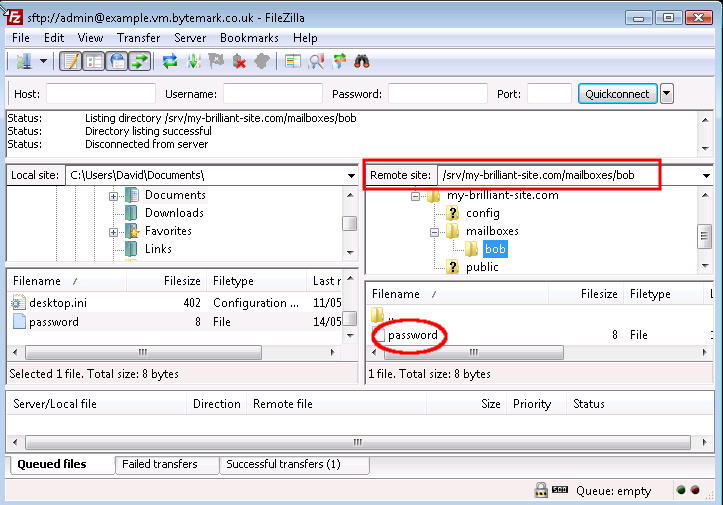
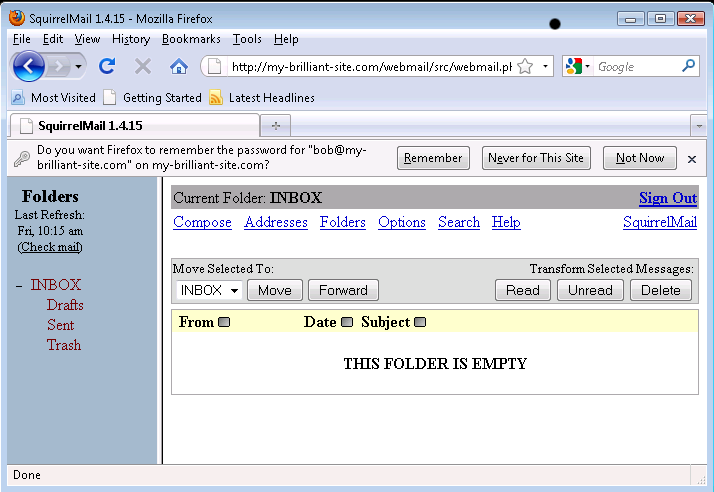
That is all that is needed to set up a new mailbox. To test we can immediately use the webmail application, SquirrelMail, supplied with Symbiosis.
We’ve seen in the previous section the basic steps required to configure a new email account upon a domain. For most users this is all the configuration that is required, however an advanced user might wish to take advantage of some more optional configuration.
If you would prefer to have emails to a new address sent on to,
create a file named
/srv/my-brilliant-site.com/mailboxes/bob/forward. In this file just
enter the name of the account that mail should be
forwarded to; this might be something like dave@example.com.
This file can do many other things than just forwarding email, as explained in its reference section.
Symbiosis comes with in-built virus and spam detection, however it is not enabled by default. There are two principal aspects to this, namely
- The use of SpamAssassin to scan each email to determine if a message is unwanted;
- The use of ClamAV to detect viruses in emails.
Each of these is configured separately, on a per-domain basis, giving choice as to which preventative measures are applied to your email.
Email can be rejected or tagged, based on its SPAM score determined by SpamAssassin. This is not enabled by default, but can be enabled in much the same way as the blacklists above.
The default action is to reject, i.e. bounce, email that is determined by SpamAssassin to be SPAM. This can be changed to accept all email, but tag it with a header field to allow users to filter it themselves. This header is detailed in Section 13.10, “Filtering mail using headers”.
To enable SPAM scanning:
Connect to your machine using FileZilla
On the remote directory tree, navigate to
/srv/my-brilliant-site.com/config.On your local machine create a file called
antispam. If you want to reject email, i.e. bounce email, that is classified as spam, this file should be empty. If you’d rather accept all email, but tag it as spam, this file should contain the wordtag.Having created the file, right click on it and select to transfer it to the remote system. Make sure that the remote file has the correct name, i.e. no extra
.txtextension.
ClamAV is activated in a similar way to SpamAssassin. It can also be set to tag or reject. Again, a header is added to message that has been scanned. This is detailed in Section 13.10, “Filtering mail using headers”.
To enable virus scanning:
Connect to your machine using FileZilla
On the remote directory tree, navigate to
/srv/my-brilliant-site.com/config.On your local machine create a file called
antivirus. If you want to reject email, i.e. bounce email that has viruses in, this file should be empty. If you’d rather accept all email, but tag it to show that it has a virus in, this file should contain the wordtag.Having created the file, right click on it and select to transfer it to the remote system. Make sure that the remote file has the correct name, i.e. no extra
.txtextension.
Although most users will prefer to receive and write their emails using a dedicated client (such as ThunderBird, or Microsoft Outlook) the Symbiosis system includes a mail client you can access with nothing more than a web-browser.
This section briefly documents using the Squirrelmail webmail system.
To log in to webmail, start your browser and head to http://my-brilliant-site.com/webmail.
Enter your email address in the field, and your password in the field.
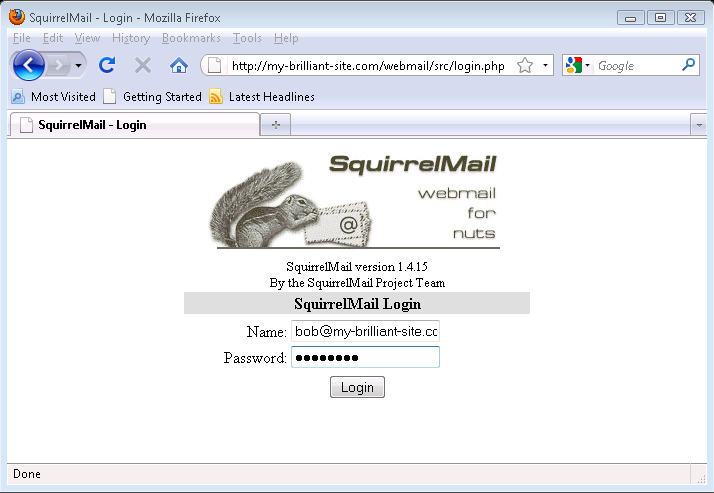
Click the button, and assuming the Name and Password fields were correct, you will be presented with your Inbox where you can read and send email.
The following details might be needed when setting up a mail client to use an email account. The user of bob@my-brilliant-site.com on the machine example.vm.bytemark.co.uk has been chosen for these worked examples.
It is recommended that all communication with the mail server is conducted over encrypted connections, either using SSL, or TLS.
Incoming email can be collected using either the IMAP or POP3 protocols. IMAP is generally recommended over POP3 as it can handle folders, push notification, can selectively download message parts, and the email remains on the server enabling back-ups to be made.
Outgoing email is sent using SMTP. It is good practice to send any outgoing email via the Symbiosis server, rather than any relay service provided by your ISP.
For both sending and receiving email, the following login information would be used.
- Username
- bob@my-brilliant-site.com
- Password
-
(contents of
/srv/my-brilliant-site.com/mailboxes/bob/password) - Server name
- example.vm.bytemark.co.uk
The default ports are used for all protocols. For further details see Section 13.1, “Port Configuration”.
It is common for Internet service providers to block the standard outgoing email port, i.e. port 25. If your email client complains that it cannot connect to your server on this port, then port 587 is provided as an alternative.
Before you start this chapter
- Connect to your server over SFTP using FileZilla (see Chapter 2, Connecting to your server with FileZilla and SFTP).
- Set up a website (see Chapter 3, Website setup).
Fast forwarding to the scenario where you have a web hosting client who has designed their own site and would like to upload it themselves. However it is not necessary to grant them access to all domains on the machine, or even the config or mailboxes section of their own domain.
This is typical for a shared hosting client, and the solution
is to give them FTP access. This limits them to the
files inside the public/ directory, i.e. only those
associated with the website.
In this example, access to the content of the my-brilliant-site.com
site is being given to another user, but they are only to have access
to /srv/my-brilliant-site.com/public/. To set this up,
an FTP password is being created.
Connect to your machine using FileZilla.
Navigate to
/srv/my-brilliant-site.com/config/Create a file
ftp-passworda that contains a secure password your shared hosting client will use, ensure that theconfigdirectory is selected b and upload the file, c. Make sure that there is no txt extension on this file.
Now that is all that is needed. Access to the machine can now be
granted over FTP using the username my-brilliant-site.com and the
password being the contents of
/srv/my-brilliant-site.com/config/ftp-password.
We will now test the connection to make sure it works, also using FileZilla, since it can be used to connect via FTP as well as SFTP.
Make sure FileZilla has disconnected from the machine.
The host a and the user b are both the domain name, in this case my-brilliant-site.com. The password c is the contents of the
ftp-passwordfile and for FTP the port number must be set to 21, d.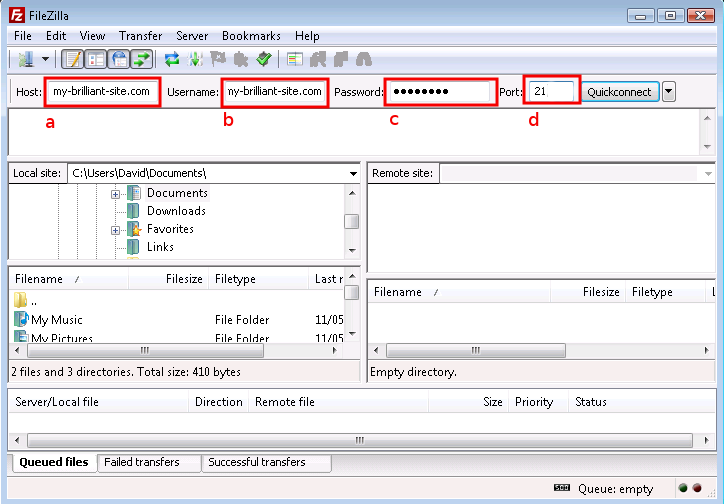
Once you connect you’ll notice that you only have access to directories beneath the
publicdirectory (here represented as "/") of themy-brilliant-site.comdirectory tree, which is all you’d need if your role was limited to maintaining or setting up a web site.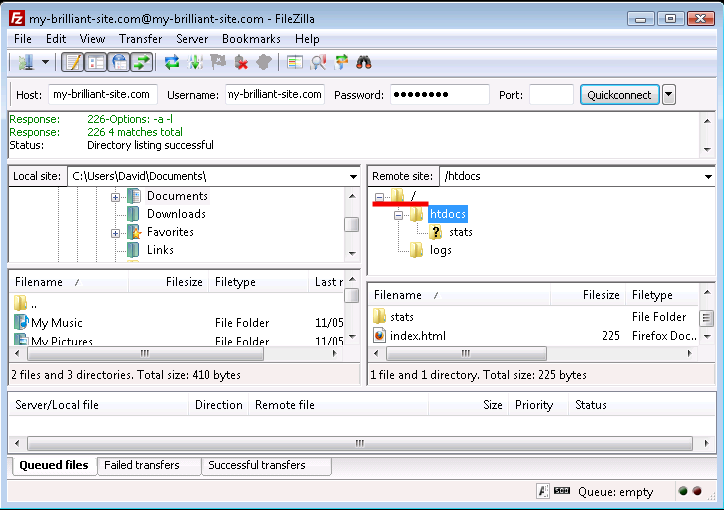
Note
If you created a sub domain such as fantastic.my-brilliant-site.com, for FTP access the user would be fantastic.my-brilliant-site.com as you might expect, but the host would be the domain, not the sub domain, in this case my-brilliant-site.com
The Symbiosis system comes with the MySQL database installed and running. It can be managed by use of the phpMyAdmin program. The following instructions show how to connect to the database on the machine example.vm.bytemark.co.uk.
Start your web browser.
Navigate to http://example.vm.bytemark.co.uk/phpmyadmin/ and enter the authentication details. The user is root and the password is the same as that of the admin user.
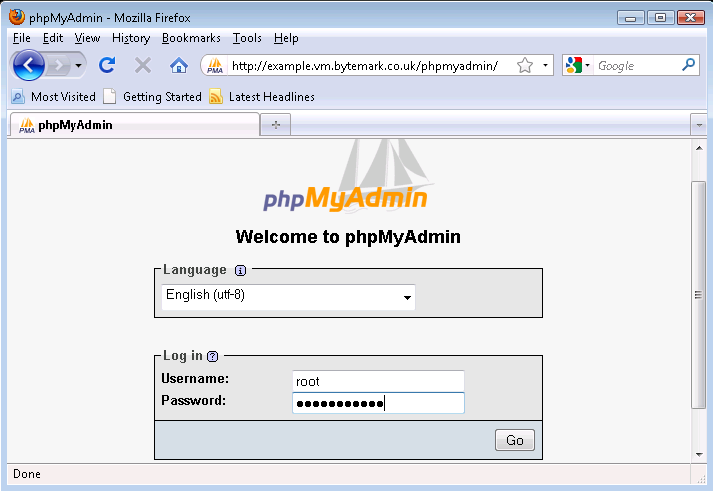
Press the button to be log in.
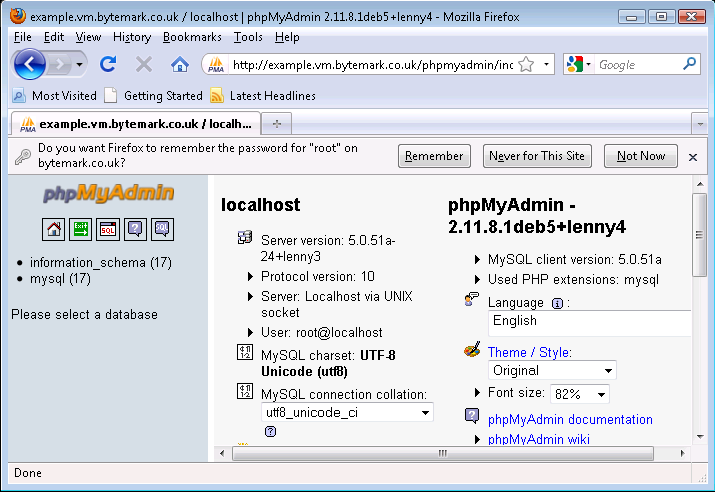
From here new databases and database users can be created as needed. phpMyAdmin is further documented on its home page.
Each domain has the ability to run its own scheduled tasks via a file known as a crontab. This file enables jobs to be run on at specific times on specific days.
The format is the same as the well-known crontab file used on many Linux systems.
A domain’s crontab is found at config/crontab. For example, the
crontab for my-brilliant-site.com would be found at
/srv/my-brilliant-site.com/config/crontab.
The file is a list of jobs, one per line. Each line specifies first the times and days at which a job should run, followed by the command to run.
The first five fields, which are separated by spaces, specify the time and date at which the job should run. The rest of the line is interpreted as the command.
| Field | Allowed values |
|---|---|
|
minute |
0-59 |
|
hour |
0-23 |
|
day of month |
1-31 |
|
month |
1-12 (or names, see below) |
|
day of week |
0-7 (0 or 7 is Sunday, or use names) |
In addition an asterisk can be used to indicate for every allowed value. For example, to execute the command echo Hello Dave. at 18:40 every day, the crontab line would read as follows.
40 18 * * * echo Hello Dave.
Three-letter names can also be specified for use in instead of numbers for days of the week and months.
- Weekdays
- Sun, Mon, Tue, Wed, Thu, Fri, Sat
- Months
- Jan, Feb, Mar, Apr, May, Jun, Jul, Aug, Sep, Oct, Nov, Dec
Any output generated by a command will be sent to the root account, unless specified otherwise. If no output is generated, no email will be sent.
The fields can be specified in the following ways:
-
As a comma separated list, e.g.
1,2,3,6 -
As a range, e.g.
1-3would mean 1, 2, 3 -
As a range with a step, e.g.
0-30/2, would mean 0, 2, 4, 6 and so on until 30. -
Or any combination of the above three, e.g.
1,2,10-12,20-24/2would mean 1, 2, 10, 11, 12, 20, 22, 24.
Ranges can also be specified across "boundaries". For example 22-2
in the hour field will be interpreted as 22, 23, 0, 1, 2; Nov-Feb in
the month field will mean 11, 12, 1, 2.
There is also a selection of shortcuts available:
-
@hourly— every hour, on the hour, -
@dailyor@midnight— every day at midnight, -
@weekly— every week at midnight on Sunday, -
@monthly— every month, at midnight on the first day of the month, -
@yearlyor@annually— every year, at midnight on 1st January.
The full crontab format is explained in more detail in the crontab (5) manual page.
The output can be emailed to any recipient by specifying the MAILTO parameter at the top of the file.
For example, we would like to mail any output from our commands to bob@my-brilliant-site.com.
#
# send any output to Bob
#
MAILTO=bob@my-brilliant-site.com
#
# run at 9am every Monday - Friday
#
0 9 * * 1-5 wget http://www.my-brilliant-site.com/cron.php
The automated backup system contained in the Symbiosis system protects against accidental deletion or corruption of file. These backups are designed to run once per day and archive the contents of a number of important system directories.
Having backups stored locally is not sufficient to provide real protection from accidents though, as they might be removed or deleted. Therefore your local backups should be archived to a remote machine.
For Bytemark customers the backup script is configured to attempt to do this, using the remote backup space provided by Bytemark, as documented upon the Bytemark support site.
Your system will maintain full backups of the following locations:
-
/root -
/home -
/etc -
/usr/local -
/srv
Additionally every MySQL database you have upon your system will also be exported and backed up.
The backup system uses the backup2l program, which is configured to
backup the files in the above locations into the directory
/var/backups/localhost. For more information about
backup2l, please refer to its
manual
page.
As mentioned above, the backup script will attempt to ensure that your local backups are uploaded to a remote server, to protect against data loss if your system fails catastrophically.
For Bytemark customers this location should be determined automatically.
If this process fails, or you are not a Bytemark customer, you can
specify the correct location in /etc/symbiosis/dns.d/backup.name.
This should be a fully-specified rsync path.
Every day, when runs it generates output saying what has been backed up, and if there were any errors during the backup process. This email will get sent to the root account of the local hostname.
Note
It’s important to realize that the automated backups, especially their transfer to the remote backup space, is done on a best effort basis. You should carefully check the backup2l report for errors and from time to time practise recovering files at random from the remote server, to ensure that there are recoverable backups.
This chapter describes the features we provide to help increase your system security, and offer tips and suggestions on what you can do to help ensure your system remains secure.
The Symbiosis system is comprised of many components, each working together to deliver a complete solution to your hosting needs. Different systems and components of your server will generate email notifications to alert you of important events and warnings. It is important that such emails are read.
By default all system-generated emails will be delivered to the root user of your primary domain. (This is the first domain which is configured when your machine is setup, and will probably be a name such as example.vm.bytemark.co.uk.)
Rather than make it mandatory that you read the root mailbox it is suggested that you configure email forwarding such that mail sent to root@example.vm.bytemark.co.uk is delivered to your personal email address.
A common means of compromising machines is known as a "dictionary attack", this involves a remote user (or computer) trying to connect to a server with a collection of thousands of usernames and passwords.
This dictionary of usernames and passwords will include common choices such as a username of "test" and a password of "test", along with many other less-likely looking candidates. Detecting these attempts is very straightforward, and is something that our system manages as documented in Section 14.2, “Blocking abusive remote hosts”.
Note
This important security measure can catch you out if you repeatedly attempt to access the server using incorrect credentials, as you’re likely to find your own IP address becomes blacklisted. See Section 20.2, “Firewall problems?” for help with this situation.
The best defense is to ensure that when you add users, or change system passwords, that you never ever choose simple passwords which might be liable to be guessed, or included in an attackers' dictionary.
There is a regular test on all the passwords used to access email and FTP under Symbiosis, the output of which will get sent to the root email account, please see the note in earlier in this chapter regarding email notifications.
Over time security bugs can be found in software packages, and if such a problem is discovered in a package you’re using then your machine is at risk until it has been updated.
The Symbiosis system is configured to automatically download and install appropriate security updates to the packages in the base operating system and from the Symbiosis repository itself.
However if you’ve chosen to install additional, external, applications such as Wordpress you must ensure that you look for updates regularly. Often this can be done by subscribing to the application’s announcements mailing list.
So far we have looked at making connections and transfer files using the SFTP proctocol. For certain operations it is also necessary to connect using the SSH protocol. This is used to gain command-line access to the machine.
There are two connection programs are documented, depending on your desktop environment, and your preference.
So far connecting using SFTP has been documented. This is used to manage files on the machine. From time to time it can be necessary to have to run commands on the machine itself. This is where SSH comes in.
SSH allows shell access to a machine, which provides the ability to run commands directly on that machine. Shell access is the equivalent of the MS-DOS or cmd prompt on Windows PCs, or the terminal on machines running Mac OS X or Linux. SSH is an encrypted protocol, like SFTP, ensuring that all commands and passwords pass between your computer and the server are protected against eavesdroppers.
For Bytemark customers, SSH is also used to access the Console Shell of the machine.
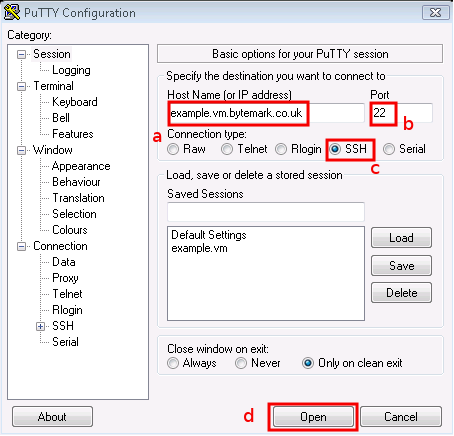
PuTTY is a free and open-source SSH application, and available for download from its homepage. It is available for both Windows and Linux desktop machines.
Start PuTTY; Under Windows you may get a Security Warning — if so you need to click the button.
Enter your server’s name in the Host Name field a; the Port field b should read 22, and the SSH radio button c. Click d to start the connection.
The PuTTY command window will open; the first time you do this, as with FileZilla, you get a Security Alert, warning that the key is untrusted. It is safe to say Yes the first time you connect to your machine.

At the Login as prompt type admin and press enter. Then the [label]admin@example.vm.bytemark.co.uk’s password| prompt appears. Enter the password followed by enter. Nothing is displayed when the password is entered.
You’ll log in and get presented with the
admin@example:~$prompt, ready to accept commands.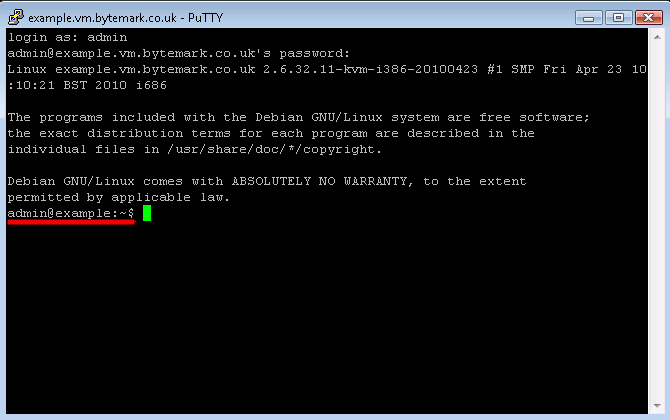
Tip
When the machine is setup, the root and admin, as well as the mysql database root passwords are all the same.
Both Linux and Mac OS X desktop machines tend to come with the ssh command available.
Open a terminal emulator and enter the command ssh admin@example.vm.bytemark.co.uk.

The first time you connect to your machine a warning message about the authenticity of the host will appear. The first time you connect to the machine, we can assume the host is authentic. So enter "yes", to accept the key and to continue connecting.
The connection has been made as user admin, so enter the admin user password , a; that does not get echoed to the screen. At the end of the dialogue you see the prompt,
admin@example:~$, b.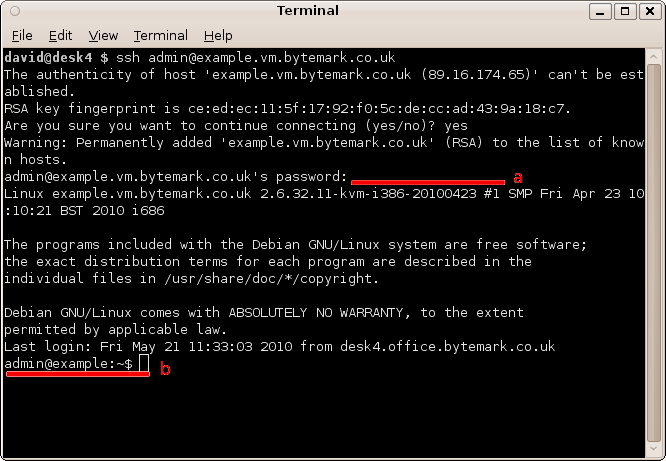
Before you start this chapter
- Connect to your server via SSH (see Chapter 10, Connecting to your server via SSH).
Each time you need to add a new SSL site to your Symbiosis system you need to:
- Acquire an additional dedicated IP address.
- Configure the site to use that IP address
- Generate an SSL key and certificate request.
- Buy or generate an SSL certificate.
- Upload the new certificate
One IP address is needed per SSL certificate. This means that every time you wish to add an SSL certificate to an existing site, it will need to be run under its own IP address.
First you must have an additional IP address routed to your machine. Your ISP should be able to do this.
Once your machine has been allocated an additional IP Address, you must tell your machine to accept traffic addressed to both your original and new IP addresses
This is a standard Debian procedure rather than something specific to Symbiosis, but for convenience it’s described here.
Make an SSH connection to your server as detailed in Chapter 10, Connecting to your server via SSH, connecting as admin.
Run sudo nano /etc/network/interfaces, and add the following lines to the bottom of the file. You will be prompted for the admin password, and you should type it in to gain the ability to edit the file.
auto eth0:0

iface eth0:0 inet static
  address 1.2.3.4
  netmask 255.255.255.255
You should substitute your new IP address for 1.2.3.4. If there is already an entry for eth0:0, you can use eth0:1 and so on. The netmask should always be 255.255.255.255.
Save the file and leave the editor by typing ctrl+x.
To activate the new interface run sudo ifup eth0:0.
It has been assumed that the site requiring the new IP address is already configured as described in Section 3.1, “Hosting a web page using your own domain”.
Use FileZilla to connect to the machine as admin.
Create the file
/srv/my-brilliant-site.com/config/ipwith the new IP address in it. In our case it will be 1.2.3.4.
Within an hour Symbiosis will include this change in your DNS data and upload the new data to the name servers. This will ensure that the system knows that your machine should listen upon an additional IP address, and it will also ensure that the DNS entries for the domain are updated to point to the dedicated IP address, and not the default IP of your machine.
In order to purchase an SSL certificate, you need to generate an SSL key and a certificate request on the Symbiosis machine.
Connect to your machine over SSH as admin (see Chapter 10, Connecting to your server via SSH)
Change to the
config/directory of the site that needs the SSL certificate. In our example, we run cd /srv/my-brilliant-site.com/config.First we generate the key. To do this run openssl genrsa -out ssl.key 1024. This generates a 1024-bit key with no passphrase.
Next we generate the certificate request. We run openssl req -new -key ssl.key -out ssl.csr. This produces a series of prompts. It is important that the correct information is entered at each prompt. In our case the exchange runs as follows.
You are about to be asked to enter information that will be incorporated into your certificate request. What you are about to enter is what is called a Distinguished Name or a DN. There are quite a few fields but you can leave some blank For some fields there will be a default value, If you enter '.', the field will be left blank. ----- Country Name (2 letter code) [AU]:GB State or Province Name (full name) [Some-State]:North Yorkshire Locality Name (eg, city) []:York Organization Name (eg, company) [Internet Widgits Pty Ltd]:Bytemark Hosting Organizational Unit Name (eg, section) []:. Common Name (eg, YOUR name) []:www.my-brilliant-site.com
 Email Address []:bob@my-brilliant-site.com
Please enter the following 'extra' attributes
to be sent with your certificate request
A challenge password []:
Email Address []:bob@my-brilliant-site.com
Please enter the following 'extra' attributes
to be sent with your certificate request
A challenge password []:  An optional company name []:
 This is the name of the website that the SSL certificate is for. This must be correct. We’ve put www.my-brilliant-site.com because that is the name of the site we’re going to advertise and use. Do not enter a challenge password.
With that request, you can buy a new certificate. To view the request, run cat ssl.csr. It will look like
-----BEGIN CERTIFICATE REQUEST-----
AIIB4zCCAUwCAQAwgaIxCzAJBgNVBAYTAkdCMRMwEQYDVQQIEwpNYW5jaGVzdGVy
MRMwEQYDVQQHEwpNYW5jaGVzdGVyMQ0wCwYDVQQKEwRCbGFoMQ8wDQYDVQQLEwZU
aGluZ3kxHjAcBgNVBAMTFW15LWJyaWxsaWFudC1zaXRlLmNvbTEpMCcGCSqGSIb3
DQEJARYacm9vdEBteS1icmlsbGlhbnQtc2l0ZS5jb20wgZ8wDQYJKoZIhvcNAQEB
BQADgY0AMIGJAoGBAMrTIaLKyvsxDz9WHhY5xJvHVKD+dmAuzpv2HichYejJQTTl
gXdfrrZjVWm45ZJy9TEcB5DM0qsQBSqseMner7YvAJJ3PlTd7o3Rkjztt1orP1e7
hAkpKLW2dQAvnr3RtK2w8mK+OdJYPSJfzoChCKlG64Un2VmgDfAiNMS4GCi1AgMB
AAGgADANBgkqhkiG9w0BAQUFAAOBgQBx1I52EXnKRL1YfPYIA8CXUeFRZzDbuVKQ
+fwP5Ig5BANBldMnRePY29RH7yJ2YRXTWHfo6erWT4DZVkJhLpWwBTqB/kGcjEjv
zN7D78VSSQzEb2fOcRcxd9fWmiIcIWINisjBv9gBbGH7L3UosOtdzEWyzpEjb+Or
nL4UrZV3JA==
-----END CERTIFICATE REQUEST-----
The entire output (including the BEGIN and END lines) should be
copied and pasted into the appropriate part of the form when
purchasing.
There are generally two types of SSL certificate: those that are self-signed, and those that are signed by a third-party. Self-signed certificates are free, but cause warnings to be produced in people’s browsers. Third-party certificates are purchased, and hopefully generate no warnings.
For an example of what a warning might look like in your browser, go to https://example.vm.bytemark.co.uk.
Purchasing a certificate is straightforward. The first part is the hardest: picking a supplier. There are many available, for example RapidSSL, Verisign, or Comodo.
During the purchase process, you will be asked for the certificate request. Instructions on how to do this are shown in Section 11.3, “Generating an SSL certificate key and request”.
Once purchased, you should end up with a new certificate, and possibly a "bundle". These should be downloaded onto your local computer. Installation of these is described in Section 11.5, “Uploading your new certificate, and optional bundle”.
Now we have our certificate, we need to upload it on to our machine. If you’ve generated the certificate on the machine, you can safely skip this procedure.
Connect to your machine using FileZilla.
Navigate to the
config/directory of your domain, using the directory tree in the top right pane. We navigate to/srv/my-brilliant-site.com/config.Find your new certificate and bundle (if applicable) on the local machine, and upload both to the remote machine.
Once uploaded, we need to rename the files. This can be done by clicking on the filename in the lower right pane and selecting from the menu.
-
The certificate should be renamed to
ssl.crt. -
The bundle (if applicable) should be renamed to
ssl.bundle.
-
The certificate should be renamed to
Once this procedure has been completed we can move on to the next section.
The final step is to combine our certificate and key, such that Apache can used them.
Log on to your machine as admin over SSH.
Change directory to the
config/directory of your site. We run cd /srv/my-brilliant-site.com/config to do this.To combine the two files into one, run the following
symbiosis-combine-ssl
This generates the file ssl.combined, which where Apache will look for the SSL certificate.
Line-endings
It is very important to be consistent with line-endings when joining files. The method documented above looks strange, but ensures that the line-endings are consistent.
This file ssl.combined will now contain something like this.
-----BEGIN RSA PRIVATE KEY-----
MIICXQIBAAKBgQDK0yGiysr7MQ8/Vh4WOcSbx1Sg/nZgLs6b9h4nIWHoyUE05YF3
X662Y1VpuOWScvUxHAeQzNKrEAUqrHjJ3q+2LwCSdz5U3e6N0ZI87bdaKz9Xu4QJ
KSi1tnUAL5690bStsPJivjnSWD0iX86AoQipRuuFJ9lZoA3wIjTEuBgotQIDAQAB
AoGAF7jD2VdgkCp3vw+iazUMcq/IjR/V1oAC+Ci79BWqbuCC+N3S25RcScaqabgP
hQesn6hnQZ8MZl7b4Lv1585mjwmf+Sw7PAa09EiArpy3cg2Em6LpBBekPZs+aPIU
StLQnEZ1pCb1E1TVeWECQQCrM4BrdC4FymXSuANe5YXYhNPksNcWeujdLKVdgGjs
uXdLGWRgiAGqJo4teB1HjvbEWxYadZ6Zspvvc5qd4d6s
-----END RSA PRIVATE KEY-----
-----BEGIN CERTIFICATE-----
MIICvTCCAiYCCQDKfqq7e9IUIzANBgkqhkiG9w0BAQUFADCBojELMAkGA1UEBhMC
R0IxEzARBgNVBAgTCk1hbmNoZXN0ZXIxEzARBgNVBAcTCk1hbmNoZXN0ZXIxDTAL
BgNVBAoTBEJsYWgxDzANBgNVBAsTBlRoaW5neTEeMBwGA1UEAxMVbXktYnJpbGxp
MQ8/Vh4WOcSbx1Sg/nZgLs6b9h4nIWHoyUE05YF3X662Y1VpuOWScvUxHAeQzNKr
EAUqrHjJ3q+2LwCSdz5U3e6N0ZI87bdaKz9Xu4QJKSi1tnUAL5690bStsPJivjnS
WD0iX86AoQipRuuFJ9lZoA3wIjTEuBgotQIDAQABMA0GCSqGSIb3DQEBBQUAA4GB
ABWXBGPKldcqJsVzB6KYIEv8jLa7iYIsB5rdhP5zviC1d4rT6U0jsCsCt/H/UQtf
6Y2Jl6nRKNBkvROVT28TfZjEe3AiBoB5MTt9P0hfxYzKoxUwaBLzClLUfaeWY/qT
GAt5kCtYlBgNxMIXkNPj2weODunfpELBJ7ARKAa3+uIu
-----END CERTIFICATE-----
Once you’ve configured the SSL certificate, as described in the previous sections, you’ll find that your site is accessible to users over HTTP and HTTPS.
If you prefer to ensure that each visitor to your website uses
the SSL-protected site you can make it mandatory by creating
a .htaccess file inside your web directory root.
Continuing our example you might create the file
/srv/my-brilliant-site.com/public/htdocs/.htaccess with the following
contents:
RewriteEngine on
RewriteCond %{HTTPS} !=on
RewriteRule .* https://%{SERVER_NAME}%{REQUEST_URI} [R,L]
These contents use Apache’s .htaccess file in combination with mod_rewrite to ensure that all visitors will be redirected to the secure version of your site.
This is a detailed break down of all the configuration options and files available when configuring website hosting for a domain.
Throughout this chapter, as with the rest of this documentation, the domain
my-brilliant-site.com is used as an example.
All configuration for the domain my-brilliant-site.com will be performed
inside the /srv/my-brilliant-site.com directory.
The Bytemark Symbiosis project uses the popular Apache2 software for serving your websites, and this comes complete with PHP5 along with many of the most popular PHP extensions.
This is covered in more detail in Chapter 3, Website setup.
All the files required for a website for the domain
my-brilliant-site.com are kept in
/srv/my-brilliant-site.com/public/htdocs.
- If this directory does not exist, a 404 Not Found error will be returned.
- If this directory exists, but is empty, then a default page is shown.
-
The index file can be written in HTML or
PHP, and should be called
index.htmlorindex.phprespectively. - Once this directory is present, both http://my-brilliant-site.com and http://www.my-brilliant-site.com will show the same content, i.e. there is no need to name the site with a www prefix.
-
If different content is required for
http://www.my-brilliant-site.com then that should be put in
/srv/www.my-brilliant-site.com/public/htdocs.
If you wish to use CGI scripts for your domain, then simply copy them
to a directory named cgi-bin/ beneath the
public/ directory. They must all be marked as
executable. This means setting the permissions to 755. In
FileZilla, right click the file and select from the menu. The file should have Execute
set for the owner, group, and public permissions.
For example, for my-brilliant-site.com the scripts would live in
/srv/my-brilliant-site.com/public/cgi-bin.
Any executable files in that directory will now be treated as CGI
scripts for your domain. For example if you created the file
/srv/my-brilliant-site.com/public/cgi-bin/test.cgi This would be
referred to as: http://my-brilliant-site.com/cgi-bin/test.cgi
Each hosted website will have visitor statistics automatically
generated and accessible at http://my-brilliant-site.com/stats/. These
statistics will be updated once per day, and the raw access logs will
be made available as
/srv/my-brilliant-site.com/public/logs/.
These daily statistics can be disabled by creating the file
config/no-stats.
For example, for my-brilliant-site.com, creating the file
/srv/my-brilliant-site.com/config/no-stats will ensure that
statistics are no longer generated for that domain. If you wish to
remove any existing statistics, remove the directory
/srv/my-brilliant-site.com/public/htdocs/stats/.
It is also possible to customise the statistics generated by editing
the file public/htdocs/stats/webalizer.conf. This file is
documented at the Webalizer project
website.
You can view new websites before any DNS changes are made.
For example, if the virtual machine example.vm.bytemark.co.uk is hosting
www.my-brilliant-site.com, i.e. the directory
/srv/my-brilliant-site.com/public/htdocs has been
created, then the website can immediately be viewed at
http://my-brilliant-site.com.testing.example.vm.bytemark.co.uk.
There are some important things to note though: - There is no www part added to the domain name — it is just the directory name prepeneded to .testing.example.vm.bytemark.co.uk. - This testing alias isn’t guaranteed to work in all cases, for complex site setups it might not work entirely as expected. - The testing alias only allows the testing of websites. Therefore FTP logins, email delivery, or checking is explicitly unsupported.
In this scenario, you have registered two domains for example my-domain.com and my-domain.co.uk, but you want the same content to be served at both addresses. There is no need to create two separate directory structures, you can just set up one directory structure and then create a soft link (aka symbolic link or symlink) to the second.
Once the my-domain.com directory structure has been completed, log on to your machine as admin over SSH.
Run the command
ln -s /srv/my-domain.com /srv/my-domain.co.ukA soft link of the entire my-domain.com directory is created, the top level directory being named my-domain.co.uk.
Browsing to my-domain.co.uk will show the same content that appears at my-domain.com.
Here is an example configuration layout for the domain
my-brilliant-site.com.
-
/srv/my-brilliant-site.com/public/htdocs - This is the directory from which content is served for the URLs http://my-brilliant-site.com/ and http://www.my-brilliant-site.com/. If this directory does not exist visitors will be shown an error page.
-
/srv/my-brilliant-site.com/public/cgi-bin - This is the directory which may be used to hold CGI scripts for your domain.
-
/srv/my-brilliant-site.com/public/htdocs/stats - This directory will be automatically created, if it isn’t already present, and updated with statistics referring to the number of visitors to your website.
-
/srv/my-brilliant-site.com/public/logs - This directory will be used to store the raw access.log files for your domain. These statistics will be updated once per day, and old logs will be pruned automatically.
Secure Sockets Layer is a technique used to encrypt communication between two machines on a network. It uses a system of public and private keys to encrypt and decrypt the connection — the public key is used by the sender to encrypt, and the private key is used by the receiver to decrypt. This protocol is used not only for transactions involving a web server and browser, but also by the email servers and their clients.
In addition to the public key encryption, there is a system of trust that validates that the certificate presented actually belongs to the server that is presenting it. This system involved having the certificate signed by a trusted authority. Web browsers and email clients tend to come with a selection of certificates from trusted authorities pre-installed, which allows them to verify a previously unseen certificate as valid.
Having a certificate signed by a trusted authority involves having varying degrees of identity checks made, and paying a fee. Vendors that are able to sell you a certificate include Rapid SSL and Comodo.
As standard, a Symbiosis machine will come with an SSL certificate installed. However it will be a “self-signed” certificate, i.e. one that has not been signed by a trusted authority. This means that whenever a program connects to your machine using SSL a warning will be shown saying something along the lines of unable to verify certificate because the issuer is unknown. This does not affect the security of the connection,
Verifying a self-signed certificate as trusted can be done using the
certificate’s fingerprint, on the machine using openssl. The
default certificate on a Symbiosis machine is kept in /etc/ssl/ssl.combined.
First, the fingerprint of the certificate needs to be determined. To
do this run the following, as root:
openssl x509 -noout -in /etc/ssl/ssl.combined -fingerprint
That should output something similar to
SHA1 Fingerprint=B8:C7:1B:3F:EC:94:F2:9F:77:BC:09:60:CD:E3:EF:E0:04:F4:23:6A
Now that we have the fingerprint, we can compare it against that presented in a browser or email client. The fingerprint of a certificate should be shown in the application’s certificate viewer, allowing a comparison to be made between the fingerprint on the machine, and the one being presented in the application.
The nature of SSL is such that only one certificate can be used per service per IP address. This typically means that a new IP address is needed for a website that needs a new SSL certificate.
If you do not wish to purchase a new certificate, you can use generate your own certificate as follows. This assumes you’ve completed the instructions for generating a key and certificate request in Section 11.3, “Generating an SSL certificate key and request”.
Log on to your machine as admin over SSH.
Change to the
config/directory of your domain. In our example, we run cd /srv/my-brilliant-site.com/config.Now run openssl x509 -days 365 -req -in ssl.csr -signkey ssl.key -out ssl.crt. This will produce output similar to the following. Note that the information entered in the certificate request is shown.
Signature ok
subject=/C=GB/ST=North Yorkshire/L=York/O=Bytemark Hosting/OU=/CN=www.my-brilliant-site.com/emailAddress=bob@my-brilliant-site.com
Getting Private key
This has now generated the certificate, and saved it in ssl.crt. This certificate is valid for a year from the date generated.
Since we’ve run this on the machine, there is no need to upload anything. You can skip Section 11.5, “Uploading your new certificate, and optional bundle” and move on to Section 11.6, “Combining the certificate and key”.
This is a detailed break-down of all the configuration options and
files available when configuring how email is handled for a domain.
Throughout this chapter, the domain my-brilliant-site.com is used as an
example. Thus all the configuration for my-brilliant-site.com will be inside
the /srv/my-brilliant-site.com directory.
The mail servers have been set up with standard port assignments as follows. These are all the standard ports for the protocols.
| Service | Port | Encryption |
|---|---|---|
|
POP3 |
110 |
TLS (optional) [a] |
|
IMAP |
143 |
TLS (optional) |
|
SMTP |
25 or 587 |
TLS (optional) |
|
POP3 |
995 |
SSL |
|
IMAP |
993 |
SSL |
|
SMTP |
465 |
SSL |
[a] To use the optional encryption "TLS encryption, if available" should be checked in the mail client. See Section 4.4, “Configuring email clients” for more information about this. | ||
In order for a domain to be configured to accept email, one of two
things must be present. Either the domain must have a
mailboxes/ directory present, or one of the files
config/default_forward or config/aliases must be present.
For example, if the domain my-brilliant-site.com would like to host
mail normally, i.e. one mailbox per user hosted on the same machine,
then the directory /srv/my-brilliant-site.com/mailboxes
should be created. Then in there, one directory per user should be
created. If bob@my-brilliant-site.com would like to receive mail,
then /srv/my-brilliant-site.com/mailboxes/bob/ should be
created.
Assuming that this is the only directory inside
/srv/my-brilliant-site.com/mailboxes then only mail
addressed to bob@my-brilliant-site.com will be accepted. Any other
mail addressed to my-brilliant-site.com will be rejected.
If you would like to accept all mail for my-brilliant-site.com,
regardless of who it is addressed to, then create the file
/srv/my-brilliant-site.com/config/default_forward. The contents of
this file should be a single email address, or a comma-separated list
of email addresses. For example, to forward all mail to
bob@my-brilliant-site.com, regardless of who it is addressed to,
then /srv/my-brilliant-site.com/config/default_forward should
contain bob@my-brilliant-site.com.
If you would like the domain nomail.my-brilliant-site.com not to
receive any mail at all, then remove the directory
/srv/nomail.my-brilliant-site.com/mailboxes and ensure
that the file
/srv/nomail.my-brilliant-site.com/config/default_forward does not
exist.
The password for a mailbox should be set by the contents of a file
named password inside a user’s mailbox directory. The contents of
this file may be in plain text, or encrypted.
To encrypt a password on the command line, you can run the following command, substituting "my password" for your password. This encrypts the password using the SHA-512 algorithm.
echo -n "my password" | perl -e 'print crypt(<STDIN>,
                        "\$6\$".join("", (".", "/", 0..9, "A".."Z", "a".."z")
                        [rand 64, rand 64]));' > password
This just uses the standard crypt function available under most
Linux platforms, as well as perl and PHP.
All email addresses can be used with a suffix. This allows people to
filter their email by the To: address. The separator between the
local part and suffix is the + sign.
For example, Bob signs up to a shopping site at http://example.com. He might use bob+example@my-brilliant-site.com his email address when signing up, such that he can filter all email from that shop.
There are two methods of forwarding email. The first is a per-mailbox
forwarding service, and the second is a per-domain service. For the
per-user service, a file named forward should
be put in a user’s mailbox directory. The per-domain service uses the
same file format as the per-user service, but the file should be
uploaded to config/default_forward instead.
For example, bob@my-brilliant-site.com would set up a file called
/srv/my-brilliant-site.com/mailboxes/bob/forward.
If all the mail for my-brilliant-site.com needed to be forwarded
elsewhere, then the file would be called
/srv/my-brilliant-site.com/config/default_forward.
Both of these files can be interpreted in two ways. Firstly they can be a comma separated list of email addresses. For example, if Bob wanted to forward his email onto Charlie and Dave, his forward file might read
charlie@example.com, dave@example.com
The second way these files are interpreted is as an Exim filter file. The full specification is documented at the Exim project site.
Here are some examples of what is possible.
To forward mail on, but keep a copy
# Exim filter
unseen deliver charlie@example.org, dave@example.com
To rewrite all mail for a domain to example.com. This is probably
best used in config/default_forward.
# Exim filter
deliver $local_part@example.com
The Exim documentation has further examples of what is possible.
It is possible to set a vacation message for a user by putting a
message in file called vacation in the user’s mailbox directory.
For example, for bob@my-brilliant-site.com, the message would go in
/srv/my-brilliant-site.com/mailboxes/bob/vacation. On Bob’s return,
the people who received vacation messages are logged to
/srv/my-brilliant-site.com/mailboxes/bob/vacation.log. Once he’s
read it, that file, along with
/srv/my-brilliant-site.com/mailboxes/bob/vacation and
/srv/my-brilliant-site.com/mailboxes/bob/vacation.db should all be
removed.
Important
Vacation messages can cause irritate other email users by replying to mailing lists, email bounces, and so on. Every effort is made to stop this from happening, but it is by no means fool-proof.
Each domain can have a list of aliases. This is just a file that
contains a list of local parts, and a list of places they should be
sent on to. This file should be in the config directory
and is named aliases.
For example, my-brilliant-site.com has a list of dummy addresses
that should be sent on to Bob. So the aliases file would be kept at
/srv/my-brilliant-site.com/config/aliases and contains the
following.
webmaster   bob@my-brilliant-site.com
chairman    charlie@example.com
staff       bob@my-brilliant-site.com, charlie@example.com, dave@example.com
This ensures that webmaster@my-brilliant-site.com is sent to bob@my-brilliant-site.com; chairman@my-brilliant-site.com is sent to charlie@example.com; staff@my-brilliant-site.com is sent to bob@my-brilliant-site.com, charlie@example.com, and dave@example.com.
Here is an example configuration layout for the domain
my-brilliant-site.com. All the following files are kept in
/srv/my-brilliant-site.com/.
-
/mailboxes -
This is where
individual mailboxes are defined. If this directory does not exist,
then mail will not be accepted for
my-brilliant-site.com, unless a default forwarding address or filter has been set up. -
/mailboxes/bob - Mail will be accepted for the email address bob@my-brilliant-site.com.
-
/mailboxes/bob/Maildir - This is where the email for bob@my-brilliant-site.com will be delivered. It will be created automatically upon receipt of the first message to that address.
-
/mailboxes/bob/password - File containing the password for bob@my-brilliant-site.com allowing him to collect his email over IMAP/POP3, and relay email using SMTP. His username is the same as his email address. See Section 13.3, “Password files” for more information.
-
/mailboxes/bob/forward - File containing either a comma-separated list of addresses, or an Exim filter. All mail addressed to bob@my-brilliant-site.com will be forwarded to the list of addresses, or processed by the filter. See Section 13.5, “Forward files” for more information.
-
/mailboxes/bob/vacation - File containing a vacation message for Bob. See Section 13.6, “Vacation messages” for more information.
-
/config/aliases - This file contains a list of aliases for a domain. The format is the local username followed by one or more spaces, and then comma separated list of email addresses which should receive the mail. See Section 13.7, “Email alias lists” for more information.
-
/config/default_forward - File containing either a comma-separated list of addresses, or an Exim filter. All mail addressed to the domain my-brilliant-site.com for local parts without directories under mailboxes will be forwarded to this address or processed by this filter. See Forwarding Email for more information.
-
/config/bytemark-antispam - If this file is present, then only email received via the Bytemark wholesale anti-spam service will be accepted. All other email will be temporarily deferred. See Section 15.3, “Using the Bytemark anti-spam system” for details on how to set this up.
-
/config/antispam - If this file is present, then all email for the domain my-brilliant-site.com will be scanned by SpamAssassin to determine whether it is spam. If it is spam, it will be rejected. If that file begins with the word tag, mail will never be rejected, just tagged as usual. See the section called “Scanning email to prevent spam and viruses” more information.
-
/config/antivirus - If this file is present, then all email for the domain my-brilliant-site.com will be scanned for viruses by ClamAV. A message is determined to contain a virus, it will be rejected. If that file begins with the word tag, mail will never be rejected, just tagged. See the section called “Scanning email to prevent spam and viruses” for more information.
-
/config/blacklists/sbl.spamhaus.org - Reject mail for this domain if the sending machines’s IP is listed in the Spamhaus Block List.
-
/config/blacklists/xbl.spamhaus.org - Reject mail for this domain if the sending machines’s IP is listed in the Spamhaus Exploits Block List.
-
/config/blacklists/pbl.spamhaus.org - Reject mail for this domain if the sending machines’s IP is listed in the Spamhaus Policy Block List.
-
/config/blacklists/sbl-xbl.spamhaus.org - Reject mail for this domain if the sending machines’s IP is listed in either the Spamhaus or the Exploits block lists.
-
/config/blacklists/zen.spamhaus.org - Reject mail for this domain if the sending machines’s IP is listed in the Spamhaus Zen Block List, which is a combination of the Spamhaus, Exploits, and Policy block lists.
The configuration for SpamAssassin for the admin user is kept in
/srv/.spamassassin/user_prefs. Here you can adjust what score is needed to
reject spam, and which tests are used during scanning. This file will only
appear after a mail has been received with spam detection turned on, but
one can be created and configured before this occurs.
The file contains comments and instructions, and further tips can be found on the SpamAssassin wiki.
In brief, to cause more mail to be rejected, you need to reduce the
threshold score. Therefore change the line reading # required_score
5 should be changed to required_score 4. Notice that the # has
been removed at the start of the line to un-comment it.
Similarly if mail is being rejected, you can increase the score.
Further instructions can be found on the SpamAssassin wiki.
There is no facility to train the SpamAssassin Bayesian learner yet.
Headers are added to messages when spam or virus scanning is enabled. These can be used by email clients to filter email, for example in to spam or quarantine folders.
With spam scanning enabled, any email that is accepted has the following headers added
-
X-Spam-Score -
X-Spam-Bar -
X-Spam-Status
The score is determined by SpamAssassin, and is the basis for acceptance or rejection. The higher the score, the more certain SpamAssassin is that the message is unwanted. The default threshold for rejection is 5.
The bar is a length of pluses or minuses that provide an easy-to-parse
representation of the score. A positive score is given pluses, a
negative score minuses. For example a score of 5.6 would be
represented as ++++++; a score of -2.2 would be represented as --.
The status is always either innocent or spam, depending on the
score.
When virus scanning is enabled, the header X-Anti-Virus is added to messages
that have been scanned. This is set to either infected or clean.
There are three lists from Spamhaus that can be used to reject email based on the sender’s IP address, namely
- The Spamhaus Block List (SBL)
- a list of addresses from which Spamhaus does not recommend receiving email.
- The Exploits Block List (XBL)
- a list of hijacked computers infected by third party exploits and viruses.
- The Policy Block Lust (PBL)
- a list of addresses that should not be sending unauthenticated email at all.
These lists are combined to form the Zen list.
The following instructions will enable use of these lists on our example domain my-brilliant-site.com.
Connect to your machine using FileZilla
On the remote directory tree, navigate to
/srv/my-brilliant-site.com/config.In this directory, create another directory called
blacklists. This is done by clicking the right mouse button on theconfigdirectory, and selecting from the menu that pops up.On your local machine create a file called
zen.spamhaus.org. This is just an empty file.Once this is done, navigate to the
blacklistsdirectory on the remote file system, and selectzen.spamhaus.orgfrom the local file system, and upload it. Make sure that the remote file has the correct name, i.e. no extra.txtextension.
That is all that is needed to start using the Spamhaus Zen blacklist. If you’d rather use a combination of lists create one or more of the following files:
-
sbl.spamhaus.orgto enable the SBL list -
xbl.spamhaus.orgto enable the XBL list -
pbl.spamhaus.orgto enable the PBL list -
sbl-xbl.spamhaus.orgto enable the combined SBL and XBL list -
zen.spamhause.orgto enable the combined SBL, XBL, and PBL list
The firewall component of the Symbiosis system serves three functions:
- Restricting the incoming connections which are permitted to reach your machine.
- Controlling which outgoing connections your machine is permitted to make.
- Blocking connections from remote hosts engaging in abusive behaviour.
All configuration of the firewall is conducted via the presence or
absence of files in a number of directories beneath the prefix of
/etc/symbiosis/firewall.
| Directory | Purpose |
|---|---|
|
|
A persistent record of IP addresses which are blacklisted, such that no connections will be permitted from them. |
|
|
Settings related to the incoming connections your machine will receive. |
|
|
The place to add local customisations. |
|
|
Settings related to the outgoing connections your machine is permitted to initiate. |
|
|
A persistent record of IP addresses which are always allowed to connect to your server. |
In short to allow an incoming connection to arrive at your machine, and be accepted, on port 22, you would create the file /etc/symbiosis/firewall/incoming.d/10-ssh. In this example there are two things that we’ve done:
-
Created the file beneath the
/etc/symbiosis/firewall/incoming.dto reference the fact that the restriction applies in the incoming direction. - Named the file 10-ssh, where "10" is a number which is useful for sorting the rules in the generated firewall, and "ssh" refers to the protocol and has an implicit relationship to the port the service uses of 22.
There are two ways the files in the incoming.d and outgoing.d directories are used:
- If the files are empty then connections are globally accepted for that service.
- If the file contains a list of hostnames, or IP addresses, then only connections to/from those hosts will be allowed.
If you were wishing to ensure that your host would only accept incoming SSH requests from your office you might run something like this:
echo "office.my-brilliant-site.com" > /etc/symbiosis/firewall/incoming.d/10-ssh
This would ensure that when the firewall was generated incoming connections on the SSH port would be accepted from the host office.my-brilliant-site.com but not from anywhere else.
The firewall-blacklist tool runs once per hour, and is designed to scan
your server’s logfiles for abusive behaviour from malicious remote hosts.
Malicious activity which is detected will result in the remote host being
denied further access to your server.
Currently we regard malicious activity as:
- Invalid SSH logins.
- Invalid FTP logins.
- Invalid SMTP relay attempts.
Disabling the firewall completely will disable the blacklisting behaviour, but you might also wish to disable that seperately.
To do so run the following two commands:
touch /etc/symbiosis/firewall/disabled.blacklist
firewall
TODO Refer to the FileZilla touching recipe instead.
(The first will ensure the blacklisting is disabled, and the second will ensure that this setting is honoured immediately.)
The firewall-whitelist tool runs once per hour, and is designed to
perform the opposite task to the firewall-blacklist script - in short
it is designed to ensure that any remote host which has successfully
connected to your server in the past isn’t (accidentally) blacklisted in
the future.
Every hour the script will examine the successful logins which have been observed within the past month. Each IP address which has successfully been the source of a login attempt will be permitted access to the system on a global basis, and will thus not be locked out.
By default outgoing connections by the web server have been disabled. This prevents many ways of infecting a machine with malicious software following a compromise in a web application.
However there are legitimate cases when a web application might need to make such a connection.
By default the firewall contains the rule:
/etc/symbiosis/firewall/outgoing.d/50-www-data
This rule is designed to prevent your webserver from making outgoing HTTP connections - if you have a PHP application which needs to make outgoing HTTP connections you will need to remove this file:
rm /etc/symbiosis/firewall/outgoing.d/50-www-data
Then rerun the firewall to make the changed configuration live:
firewall
The Symbiosis firewall package should allow you to carry out the most common tasks, simply by creating files named after the services you wish to permit or deny.
However there are times when you might wish to make your own custom additions, and for this purpose the firewall package allows you to run an unlimited
number of custom scripts/programs once it has loaded the rules - these
scripts may perform arbitrary actions, but will be most typically used to update the firewall rules, via the iptables command.
Executing local scripts
-
By default every single executable located in
/etc/symbiosis/firewall/local.dis executed, in turn, after the firewall has finished loading.
If you wish you may disable the firewall completely, allowing remote users to connect to any service you have running upon your machine.
We’d not recommend that you disable the firewall, because it does provide a increase in system security, but if you wish it is possible by executing the following two commands:
touch /etc/symbiosis/firewall/disabled
firewall
To take full advantage of the Symbiosis system, your domain needs to be configured to have Bytemark’s name servers as authority for it.
What follows only applies if our name servers are used; if that is not the case you will need to manage your DNS data outside of the Symbiosis system. Section 15.1, “Default DNS records” gives a listing of the records needed for the correct functioning of the system.
All domains which are hosted upon a Symbiosis system will have their DNS records automatically uploaded to the Bytemark Content DNS servers.
By default a set of typical records is created for each hosted domain with MX records pointing to the local system, and aliases such as www. and ftp. for convenience. If you wish you may edit the records to make custom additions or otherwise make changes to those defaults.
For the domain "my-brilliant-site.com" you will find the
auto-generated DNS records in
/srv/my-brilliant-site.com/config/dns/my-brilliant-site.com.txt
The DNS files are uploaded to the Bytemark content DNS service every hour, and allow you to use the full range of available TinyDNS options. These options are documented upon the Bytemark Website and in the TinyDNS documentation.
The default records generated are listed in
/etc/symbiosis/dns.d/template in format used by
TinyDNS. In the template
given below, $domain should be substituted for domain, and $ip for
an IP address. A brief explanation of each line is given.
If your domain is hosted elsewhere it would be prudent to create the records explained in notes 2, 3, and 4 in the listing below in order for everything to work as advertised.
DNS records template.
# # Nameserver records.# +ftp.$domain:$ip:300 +www.$domain:$ip:300 # # MX record
# @$domain:$ip:mx.$domain:15:300
|
These lines create NS and SOA records for $domain pointing at
a.ns.bytemark.co.uk, b.ns.bytemark.co.uk, and c.ns.bytemark.co.uk.
The time-to-live for these records is 300 seconds. Note that the
double colons in these records are deliberate.
|
|
This creates an A record pointing $domain to the IP address $ip,
and a PTR record for the reverse. Again, the TTL is 300
seconds.
|
|
These two lines add A records to direct ftp.$domain, and
www.$domain to the IP address $ip. Once again, the TTL for
these records is 300 seconds.
|
|
This last record creates an MX record directing mail for
$domain to mx.$domain, with a distance of 15. It also creates
an A record pointing mx.$domain to The IP address $ip.
The TTL for these records is also 300 seconds.
|
If you would rather have a different template to be created for your
domains, feel free to edit /etc/symbiosis/dns.d/template.
Ensure that the pattern of $domain and $ip is followed for the
generation to work.
In addition to these records for each domain, a wild-card A record is
needed for the hostname such that the .testing. prefix works. If
your machine is at Bytemark, this has already been setup for your
machine’s Bytemark alias, for example example.vm.bytemark.co.uk.
If your machine is not hosted at Bytemark, or your hostname does not
end in bytemark.co.uk then you will need to set this alias up.
Adding the following line to your DNS file will work, assuming the
domain is hosted at Bytemark. This assumes that your machine is called
host.example.com and that your machine’s IP address is 1.2.3.4.
*.host.example.com:1.2.3.4
Bytemark Hosting offer wholesale spam protection for their hosting customers.
Of course this can be integrated into the Symbiosis
system. For the domain my-brilliant-site.com the DNS file at
/srv/my-brilliant-site.com/config/dns/my-brilliant-site.com.txt
would need to be changed as follows.
Please note that this is a chargeable service.
Connect to your machine using FileZilla, as detailed in Chapter 2, Connecting to your server with FileZilla and SFTP.
Navigate to
/srv/my-brilliant-site.com/config/dns/and select the filemy-brilliant-site.com.txtfor editing.Change the line reading
@my-brilliant-site.com:1.2.3.4:mx.my-brilliant-site.com:15:300to read@my-brilliant-site.com:1.2.3.4:mx.my-brilliant-site.com:15:300::nospamAdd in the following two lines
@my-brilliant-site.com::a.nospam.bytemark.co.uk:5:300::world
@my-brilliant-site.com::b.nospam.bytemark.co.uk:10:300::world
Save the file
Now within the next hour, mail will be routed via the Bytemark anti-spam machines.
The final step is to make sure that only mail from the Bytemark
anti-spam machines will be accepted. To do this for a domain, create
the file /srv/my-brilliant-site.com/config/bytemark-antispam. This
will cause mail sent directly to your machine to be temporarily
rejected, ensuring spammers cannot circumvent the anti-spam
protection.
If you wish to move your domains between two machines running Symbiosis and using the Bytemark content DNS service, you must contact Bytemark Support to arrange the domain to be moved between content DNS accounts.
This results from the necessity for ensuring that only people with the proper authorisation can change live DNS data. Once a domain has been hosted on our network, a content DNS account will have sole authority for it.
If you purchase a second server and move some of your domains onto it, or purchase a domain from another Bytemark customer you must contact us to move authority for the domain into the correct account.
Until this is done, although the Symbiosis system will be creating and uploading data it will not be to the account with the authority to make the data live.
Reference chapter.
A crontab can also be tested. To do this you have to SSH to the machine, usually as admin to run the command.
For example, to test the my-brilliant-site.com crontab navigate to
/srv/my-brilliant-site.com/config/ and run symbiosis-crontab
--test crontab.
The my-brilliant-site.com crontab reads
# Send any output to Bob
#
MAILTO=bob@my-brilliant-site.com

#
# run at 18:40 every day
#
40 18 * * *       echo Hello Dave.

#
# run at 9am every Monday - Friday
#
0   9 * * mon-fri wget http://www.my-brilliant-site.com/cron.php

#
# Run once a month
#
@monthly          /usr/local/bin/monthly-job.sh
Therefore the output generated is
 Environment
 ------------------------------------------------------------------------
 HOME = /srv
 LOGNAME = admin
 PATH = /usr/local/bin:/usr/bin:/bin
 MAILTO = bob@my-brilliant-site.com
 ========================================================================

 Jobs next due -- Local time 2010-06-17T17:57:37+01:00
 ------------------------------------------------------------------------
 Date                       Command
 ------------------------------------------------------------------------
 2010-06-17T18:40:00+01:00  echo Hello Dave.
 2010-06-18T09:00:00+01:00  wget http://www.my-brilliant-site.com/cron.php
 2010-07-01T00:00:00+01:00  /usr/local/bin/monthly-job.sh
 ========================================================================
Note
The only environment variables that can be set within your crontab are PATH and MAILTO. All the rest are set automatically, and cannot be altered.
Initially the root password for the database is the same as that of the admin user used to to connect to your machine via SSH or SFTP. To change this you can use the phpMyAdmin interface.
As a general rule, each application should have its own username and access rights, to make sure that there is a degree of separation between all the applications on a server. This can all be done through the phpMyAdmin interface.
As a security measure, your MySQL server is not opened to the world. However you might wish to access it remotely for performing queries, or allowing other hosts to otherwise communicate with it.
Your MySQL server should be configured already to listen upon your external IP addresses. Therefore only two steps are needed to configure remote access: opening the firewall, and adding a user with remote privileges to the database.
To open a hole in the firewall to the whole internet, you should
create the file /etc/symbiosis/firewall/incoming.d/55-mysql. It is a good
idea to restrict access to the database to a list of known IP
addresses. To do this simply add IP addresses to the above file, one
per line.
Chapter 14, Firewall Reference gives full details of how the firewall works.
There are two ways to do this, either using the MySQL command line tool, or via phpMyAdmin. This section will cover doing it with the latter.
In phpMyAdmin, select the link from the front page, once you’ve logged in to it as root — see Chapter 6, Managing the MySQL database for details on how to do this.
The privileges section will present a User Overview, at the bottom of which there is a link to .
In the Add a new user screen, fill out the details in the form as needed, making sure that the Host field is set to Any host.
The privileges tick boxes lower down should be selected carefully. Most applications will need at least those in the Data section, and some of those in the Structure section. Check the documentation of the software you’re using to see what it requires.
If you want an account with all privileges, select check all.
Once you’re satisfied with everything, click . This will confirm that a user has been created.
Now return to the home screen by clicking the phpMyAdmin logo at the top left of the screen.
Finally, on the front page click the link to make sure MySQL knows about this new user.
You should now be able to access the MySQL database remotely, using this new username and password.
The Symbiosis system includes a component designed to handle backups, using the flexible backup2l software.
backup2l was selected due to its simplicity and flexibility, which allows it to be used easily. By default the backup software executes once per day and archives the contents of significant directories to a local directory.
backup2l is controlled via configuration file /etc/backup2l.conf, this
file is well documented, but in brief it contains three important pieces of
information:
-
The local directories to backup (
/etc,/srv, etc). -
The destination to which the backups should be stored (
/var/backups/localhost)/ - The number of backups to keep.
The Bytemark Symbiosis system will replace the static file
/etc/backup2.conf with a symbolic link to a generated file, which is
produced by concatenating the contents of the /etc/symbiosis/backup.d directory.
Additionally we’ve configured the backup software to easily execute a number of scripts before and after the backup is performed:
-
/etc/symbiosis/backup.d/pre-backup.d - Any executable script located in this directory is executed, prior to a backup execution.
-
/etc/symbiosis/backup.d/post-backup.d - Any executable script located in this directory is executed after a backup has completed.
To list the contents of your backup area you need to run backup2l with the "-l" flag:
~# backup2l -l
all.1: /etc/.pwd.lock
all.1: /etc/GeoIP.conf.default
all.1: /etc/X11/Xresources/x11-common
all.1: /etc/X11/Xsession
all.1: /etc/X11/Xsession.d/20x11-common_process-args
all.1: /etc/X11/Xsession.d/30x11-common_xresources
all.1: /etc/X11/Xsession.d/40x11-common_xsessionrc
all.1: /etc/X11/Xsession.d/50x11-common_determine-startup
...
Here you will see the contents of the /etc directory which have
been archived.
If you’d like to restrict this view you can apply a regular expression to filter the results. For example we can list the files which match the pattern passwd with this command:
~# backup2l -l passwd
Listing locations...
all.1: /etc/exim4/passwd.client
all.1: /etc/passwd
all.1: /etc/passwd-
all.1: /etc/phpmyadmin/htpasswd.setup
all.1: /etc/pure-ftpd/pureftpd.passwd
...
To illustrate how this works, an example is used. We’re looking for a
backup of the file /etc/passwd.
First log in to your machine over SSH (see Chapter 10, Connecting to your server via SSH) as admin.
To find the available versions of the file, run sudo backup2l -l '/etc/passwd$'. The dollar sign is there to show that you want an exact match of
/etc/passwd. The first time you run sudo you will be prompted for the admin password. The following output will be generated by backup2l.backup2l v1.4 by Gundolf Kiefer Active files in <all.1101>: 1 found in all.1101: 0 ( 1 left) found in all.11: 1 ( 0 left) Listing locations... all.11: /etc/passwd
This shows the latest available version of the file
To recover it you should run sudo backup2l -r '/etc/passwd$'. The following output will be generated
backup2l v1.4 by Gundolf Kiefer

Active files in <all.1101>: 1
  found in all.1101:       0   (    1 left)
  found in all.11:         1   (    0 left)

Restoring files...
  all.11.tar.gz: 1 file(s) using 'DRIVER_TAR_GZ'
That has restored the file to etc/passwd in the current directory.
It is not recommended to run this program in the /
directory, as any existing files will get overwritten.
It is also possible to pick which version of a file you wish to restore.
First login to your machine over SSH as admin
Then, to show all available versions of a file, run sudo backup2l -a '/etc/passwd$'. Again, the first time you run sudo you will be prompted for a password. The following output is generated.
backup2l v1.4 by Gundolf Kiefer

Listing available files...
all.101   -     1067 06/18/08 13:59:47 0000.0000 0644 /etc/passwd
all.101   +     1118 06/19/08 11:29:10 0000.0000 0644 /etc/passwd
all.108   -     1118 06/19/08 11:29:10 0000.0000 0644 /etc/passwd
all.108   +     1153 08/27/08 10:25:45 0000.0000 0644 /etc/passwd
all.11    -     1067 06/18/08 13:59:47 0000.0000 0644 /etc/passwd
all.11    +     1153 08/27/08 10:25:45 0000.0000 0644 /etc/passwd
all.1     +     1067 06/18/08 13:59:47 0000.0000 0644 /etc/passwd
Note that the versions are not shown in date order, and that the dates are in the US
mm/dd/yyformat. In that list the+indicates that the file is new and thus contained in the archive file. A-indicates that the file has been removed (or replaced). Choose which backup you wish to recover from.To recover the file dated 19th June 2008, you need backup number 101 — remember the
+indicates that it is present in that archive. To recover that file, run sudo backup2l -t 101 -r '/etc/passwd$'backup2l v1.4 by Gundolf Kiefer Active files in <all.101>: 1 found in all.101: 1 ( 0 left) Restoring files... all.101.tar.gz: 1 file(s) using 'DRIVER_TAR_GZ'
Notice the -t 101 argument which specifies which backup we want to restore from.
We have now successfully restored the file to etc/passwd in the
current directory. We can check by running ls -la etc/
total 16
drwxr-xr-x  2 root  root  4096 2008-09-09 09:56 .
drwxr-xr-x 14 root  root  4096 2008-09-09 09:51 ..
-rw-r--r--  1 root  root  1118 2008-06-19 11:29 passwd
The Symbiosis system assumes that it is running upon a host provided by Bytemark, with access to an associated external storage area.
As documented every executable located in the directory
/etc/symbiosis/backup.d/post-backup.d is executed at the conclusion of a successful backup.
By default only a single script is included, which attempts to determine the
name of the remote backup space associated with your machine and copy the
local backup directory of /var/backups to this remote location.
The Symbiosis system is comprised of several distinct components, which we’ve documented throughout the course of this reference:
- The MySSQL database server.
- Exim & Dovecott servers for handling email.
- Apache for serving websites.
- The FTP server, proftpd
Each of these services runs in an independent fashion, and it is possible under certain circumstances that these services might fail, or stop themselves.
To handle the case of services failing to execute normally we’ve included an automated service checker as part of the Symbiosis system. The service checker will check upon the health of your system, by default once every two minutes, and it will automatically restart any services which have failed.
The symbiosis-monit command is responsible for testing each of the available services, and restarting the failed ones. By default it is executed every two minutes, such that it may respond quickly to failures.
At any time you wish to check upon the health of your system you may launch it manually, when connected to your server via SSH.
kvm4:~# symbiosis-monit
= Bytemark Virtual Hosting service test report ========================

 * Host: kvm4.vm.bytemark.co.uk
 * Tests started at: Fri, 11 Jun 2010 15:55:45 +0100

 * apache2: PASS
 * clamav-daemon: PASS
 * clamav-freshclam: PASS
 * cron: PASS
 * dovecot: PASS
 * exim4: PASS
 * mysqld: PASS
 * pure-authd: PASS
 * pure-ftpd: PASS
 * spamassassin: PASS
 * sshd: PASS

 * 11/11 tests passed on first attempt.
 * Tests finished at: Fri, 11 Jun 2010 15:55:46 +0100

= End of service test report ==============================================
In this case all services are working correctly, so "PASS" was reported instead of the failing "FAIL". The possible output status are:
- FAIL
- The service failed.
- PASS
- The service appears to be running correctly.
We’re happy to accept bug reports via our usual support system. But you can make it easier for us to assist you if you check the common things first.
We have produced an FAQ which might answer the questions you’re asking.
If none of the suggestions on this help it would aid us if you were very specific about the problem you’re experiencing.
If you already had a password configured for the MySQL database prior to installing our packages it will be unchanged. The password for the root user is only changed if it is unset when the packages are installed or updated for the first time.
The Debian MySQL packages create a local user for automated use, so if you’re unsure of your MySQL password you may this login to reset it. You may find details of the Debian login contained in the file /etc/mysql/debian.cnf.
You, or a customer with FTP or SFTP/SSH access, may become locked out of the machine if repeated attempts are made to access the machine incorrectly
If you believe you’ve become locked out, via the firewall, it is possible to fix this if you have another means of connecting to your server.
Note
Users who have their hosting with Bytemark will be able to use the Console Shell] to gain access to their machine, even if the network is disabled, or the firewall is refusing direct connections.
Using your fall-back connection method connect to your server.
Navigate to the
/etc/symbiosis/firewall/blacklist.ddirectory with the command cd /etc/symbiosis/firewall/blacklist.dCheck the contents of the directory with the command ls /etc/symbiosis/firewall/blacklist.d; the presence of the file
<ip address>.autoconfirms the problem.remove the file, rm /etc/symbiosis/firewall/blacklist.d/<ip address>.auto and restart the firewall with the command firewall
Tip
You can whitelist an IP address to ensure it is never blocked by the
Symbiosis firewall. Create the directory /etc/symbiosis/firewall/whitelist.d/ and the file /etc/symbiosis/firewall/whitelist.d/<ip address>. Note that you do not add ".auto" to that filename.
Every evening your system will be configured to update itself. This ensures that you’ll have any Debian-provided security updates applied to your system. It will also update your system to the latest available collection of the Bytemark Symbiosis packages.
If your system fails to update you may correct this by running, as root:
apt-get update
apt-get dist-upgrade
apt-get -f install
The mail-server and FTP-server we’re running will refuse to work with directories which are owned by the root user.
If you find that you’ve added a new site/mailbox to your system and it doesn’t work but existing ones do then this is most likely the source of the problem.
Unless you’re handling ownership in a special way you may reset the permissions to avoid this problem by running the following command:
chown -R admin.admin /srv/
If you run into problems with the configuration of SSL-based sites please get in touch, this support is still very new and there might be a couple of kinks to work out of the process.
The most common problem is that you need to install a "bundle" or keychain file.
If the missing keychain/bundle is the problem you’ll see this logged in the Apache SSL error file beneath /var/log/apache2. Each generated SSL-site will use its own logfile - rather than the global access.log and error.log file. So taking a look at that could be useful with the shell command:
tail /var/log/apache2/*ssl*.log
You should be able to validate the combined SSL private key and certificate via the use of the openssl tool; run the shell command:
openssl verify /srv/my-brilliant-site.com/config/ssl.key
..
error 18 at 0 depth lookup:self signed certificate
OK
You’re looking for the "OK" at the end, rather than the error message which is harmless.
Q: | My new website shows only the "Bytemark Unconfigured Host" page. |
A: |
Simply upload a file to the root of your website directory, i.e.
Your new index will override our default one. |
Q: | I want http://my-brilliant-site.com/ and http://www.my-brilliant-site.com/ to show different content. |
A: | When we’ve created websites so far we’ve created directories without the www prefix, for example /srv/my-brilliant-site.com. These directories are served when clients request both http://www.my-brilliant-site.com and http://my-brilliant-site.com. If you’d like different content simply create a new directory with the www prefix . |
Q: | What is the password for the admin user? |
A: | When the packages are installed a new local admin user is created. The password for that account will be same as for your existing root account. For all work with Symbiosis we recommend you connect and login as user admin. |
Q: | How do I redirect one domain to another? |
A: | We’ll use a redirection of my-brilliant-site.com to example.com, so that when users go to www.my-brilliant-site.com, they are redirected to www.example.com.
See the Apache documentation for a full description of the Redirect directive. |
Q: | Help! My browser issues a big warning when I try to connect to my Webmail. |
A: | This is because the SSL certificate is self-signed. We’ve provided the following step-by-step guides to accepting this certificate permanently in some of the more popular browsers.
|
Q: | I’ve set up the ftp-password as instructed, but I can’t log in |
A: | The first thing to check is permissions. These need only be checked if you’ve created domains with the root user. By default the Bytemark Symbiosis package installs a new user admin
which owns the To fix this, you need to create a user to own all the /srv/ directories. It is suggested that you create a user called admin, as this will fit into the Bytemark scheme. adduser --home /srv --no-create-home admin This command will prompt you for all sorts of information, including a
password, and it will create a group called admin too. Once you’ve
created this user, you will need to change the ownership of the chown -R admin.admin /srv |
Q: | How do I modify the firewall, where is it located? |
A: | Please see Chapter 14, Firewall Reference. |
Q: | How do I enable remote access to MySQL? |
A: | Please see Section 17.1, “Enabling remote MySQL access”. |
Q: | I have a PHP script that sends emails or tries to make an external connection via http and it is not responding. |
A: | This has fallen foul of the firewall which says that web servers cannot make outbound connections. Please see Section 14.5, “Allowing web applications to make remote connections”. |
The Symbiosis project, and its documentation both have issue trackers. Before these are explained, however, we have a few tips on how to help us help you.
Firstly, make sure that no-one else has reported the same problem. The issue trackers are public, and there is a search box to help you through them.
Secondly, please use the following guidelines to make sure we have as much information as we need to diagnose, and hopefully fix the problem. We’d like to know the following:
- Tracker
There are two broad types of issue, each with its own tracker.
- Feature: a request for new functionality
- Bug: a problem with existing functionality
- Subject
It is very important to make this as descriptive, yet concise as possible. The following are examples of bad subjects
- help
- cannot login
- bug
- new feature Good subjects include
- Expected firewall update didn’t occur
- Backups are failing to take place
- Add functionality to automatically white-list IPs in the firewall
- Description
- nlahaasdad
TODO
Document a client or two:
- Thunderbird
- Outlook
The following details might be needed when setting up a mail client to use an email account. The user of bob@my-brilliant-site.com on the machine example.vm.bytemark.co.uk has been chosen for these worked examples.
It is recommended that all communication with the mail server is conducted over encrypted connections, either using SSL, or TLS.
Note
By default a self-signed certificate is used during the secure transactions. Some mail clients may warn you about this certificate being invalid. If you are at all unsure about the validity of the certificate is would be prudent to double-check it.
A self-signed certificate is one that has not been purchased from a company that specializes in certificate verification; it is quite adequate for the purpose of passing encrypted passwords over the network.
Bob would expect to see something similar to this at the top of her self-signed certificate:- Subject: EMAILADDRESS=root@example.vm.bytemark.co.uk, CN=example.vm.bytemark.co.uk, OU=example.vm.bytemark.co.uk, O=Dovecot mail server Signature Algorithm: SHA1withRSA, OID = 1.2.840.113549.1.1.5
Incoming email can be collected using either the IMAP or POP3 protocols. IMAP is generally recommended over POP3 as it can handle folders, push notification, can selectively download message parts, and the email remains on the server enabling back-ups to be made.
Outgoing email is sent using SMTP. It is good practice to send any outgoing email via the Symbiosis server, rather than any relay service provided by your ISP.
For both sending and receiving email, the following login information would be used.
- Username
- bob@my-brilliant-site.com
- Password
-
(contents of
/srv/my-brilliant-site.com/mailboxes/bob/password) - Server name
- example.vm.bytemark.co.uk
The default ports are used for all protocols. For further details see Section 13.1, “Port Configuration”
Tip
It is common for Internet service providers to block the standard outgoing email port, i.e. port 25. If your email client complains that it cannot connect to your server on this port, then port 587 is provided as an alternative.
Mozilla Thunderbird is a popular open source mail client, that runs on a variety of platforms. In this program we can use the Create New Account link on the home screen to create our new account. Alternatively select . In this worked example, Bob Example, who has the email address bob@my-brilliant-site.com will set up his email account on example.vm.bytemark.co.uk.
New Account Setup: Choose Email Account
Identity: Enter your name as you would like it to appear in the From: header in the Your Name box. Enter your email address in the Email Address box. Bob uses bob@my-brilliant-site.com.
Server Information
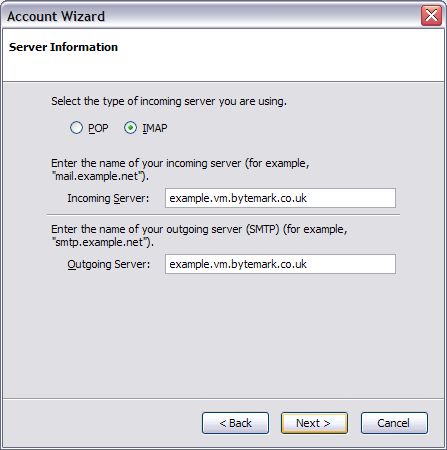
- Choose IMAP as the incoming server type
- Set the Incoming Server to the name of the machine you want to use. In this case Bob would put example.vm.bytemark.co.uk.
- Set the Outgoing Server to the same name.
User Names
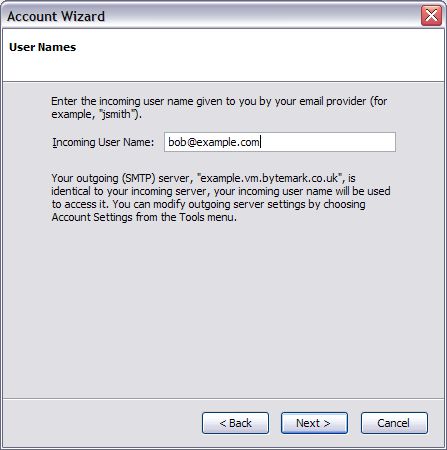
- Set the Incoming User Name to your email address. Bob uses bob@my-brilliant-site.com.
Account Name: This is the name of the account as it is known to Thunderbird. Bob chooses bob@my-brilliant-site.com for this.
Congratulations!: This just shows a summary of the information you’ve given Thunderbird. Click to create the account.
You should now be presented with a screen like the one below.
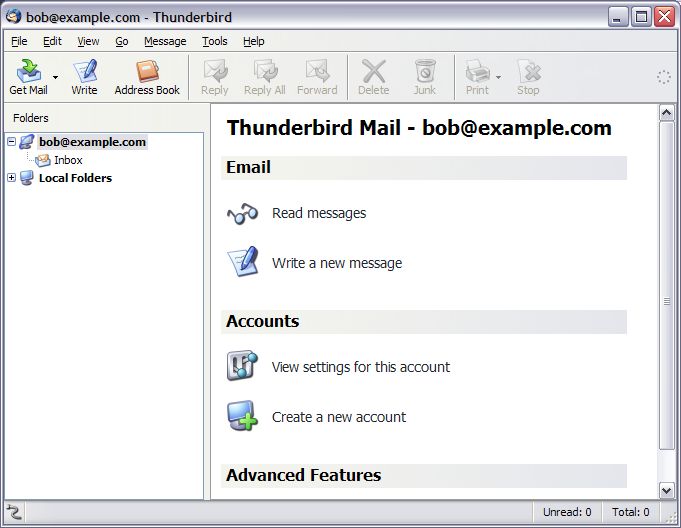
- It is highly recommended that this next step is carried out to prevent passwords and other sensitive data being transmitted over the internet in plain text.
Click on View settings for this account in the home screen (as shown above) and you should be presented with the screen below.
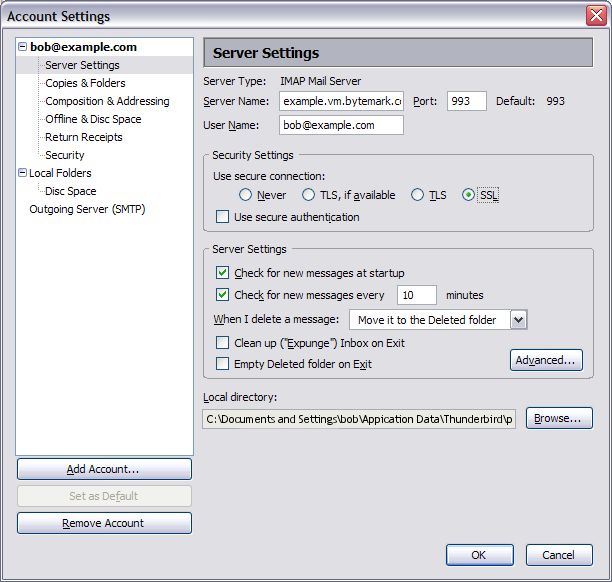
- Simply click the SSL radio button in the Security Settings box. Click OK at the bottom of the screen to apply the change.
Next time your mail is checked, Thunderbird might present a screen like the one below, warning that the certificate is invalid. This can be accepted permanently.
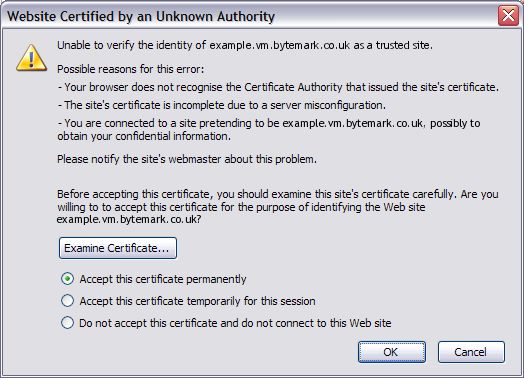
In order to relay email via your server you need to click on View settingsfor this account again, whereupon you should choose Outgoing Server (SMTP) from the list of items of the left of the new screen, changing it to a screen similar to the one below.

Select the name of your mail server in this box. Bob would choose example.vm.bytemark.co.uk. Then click …. A further screen should appear, like the one below.
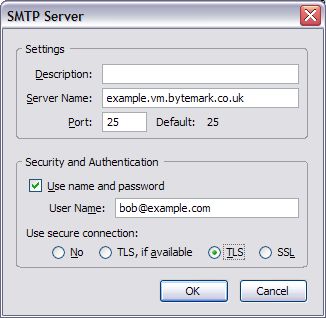
On this screen, make sure the User name and password box is checked in the Security and Authorisation box. The User Name field should contain your email address. Bob would use bob@my-brilliant-site.com.
Finally make sure that the TLS radio button is selected to ensure a secure connection between your computer and the server, and click to apply the changes.
Click again in the Account Settings window to apply the changes.
You are now all set up!
Firstly a new account needs to be added. If you’ve not used Outlook Express before, a wizard will automatically appear when you start the program for the first time. If you have used it before, go to the Settings menu and choose the Accounts item. From there you can add a new account by clicking on the button on the right-hand side of the Accounts window.
This walk-through uses the example person Bob Example, with the email address bob@my-brilliant-site.com on his virtual machine example.vm.bytemark.co.uk.
Your Name: Fill in your real name, as you would like to see it in the From: field in emails. In this case, Bob would put Bob Example.
Internet E-Mail Address: Fill in your email address. For this example, Bob would put bob@my-brilliant-site.com.
E-Mail Server Names
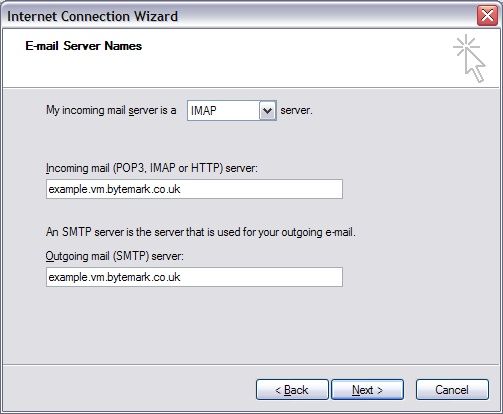
Select IMAP from the drop-down box at the top.
Fill in the name of the server in the both the incoming and outgoing mail server boxes. In this case, Bob would use example.vm.bytemark.co.uk for both.
Internet Mail Logon:

Fill in your email address as the Account Name box. Bob would put bob@my-brilliant-site.com.
Fill in the Password box with your password. Please note that the password is case-sensitive, so it is best to copy and paste it from another email if possible.
Tick the Remember Password box, if you wish the program to remember the password indefinitely.
Leave the Logon using Secure Password Authentication box unchecked.
Congratulations: The last step is a confirmation box, detailing all the settings you have entered. Click to create the account.
To send outgoing email you need to tell Outlook to use authentication. This is done by bringing up the Properties for your new account.
Click your right mouse button on the name of the account in the main Outlook Express window, and select the Properties entry on the menu that appears.
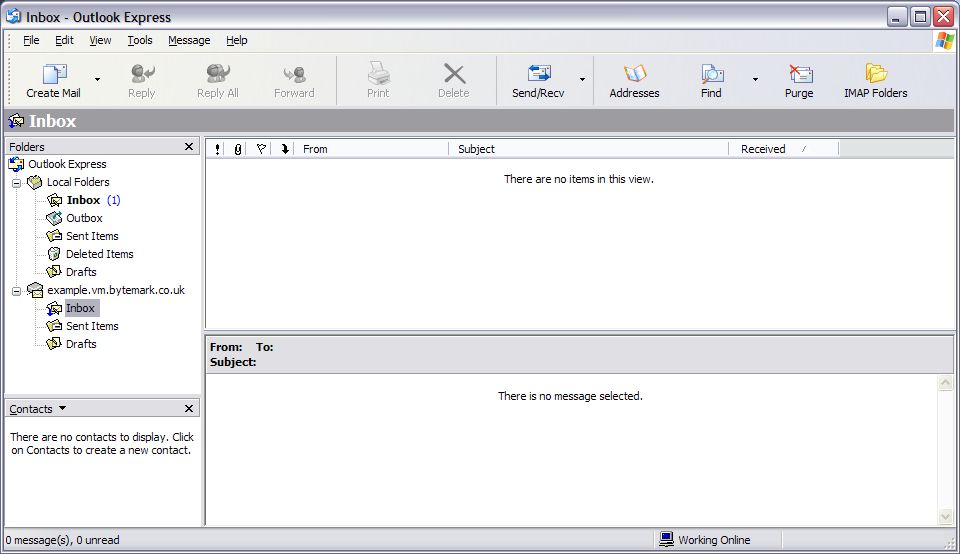
A new window will appear. Choose the Servers tab at the top of the window.
Towards the bottom of this page, under the Outgoing Mail Server heading, tick the box labelled My Server requires authentication.
Now to double check the correct username and password are being used, click the button to the right of this check box, and a new, smaller window appears.
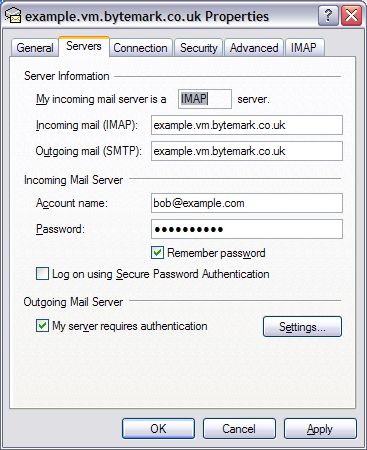
In this window, make sure that the radio button is chosen.
Click in this smaller window, returning you to the Properties window.
Click again to save the settings.
It is strongly recommended to use secure connections to collect and send email. If you do not use secure connections, your login details are passed in plain text between your computer and the server.
- Once again, access the Properties for the account by right-clicking on the account name in the main Outlook Express window, and selecting the Properties entry.
A new window will appear. Select the Advanced tab at the top of the window.
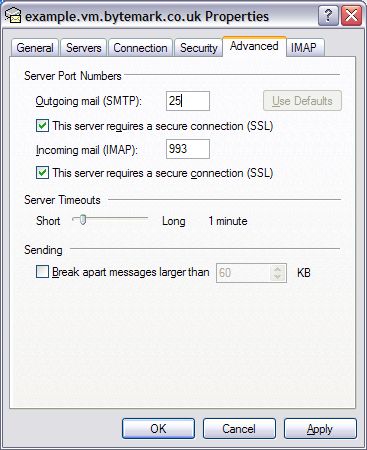
- Now check the boxes labelled , under both Outgoing mail (SMTP) and Incoming mail (IMAP). -The number in the box labelled Outgoing mail (SMTP) should stay the same. -The number in the box labelled Incoming mail (IMAP) should change to 993 when the box underneath is ticked. If it doesn’t, you should change it by hand.
- Now click to save these changes.
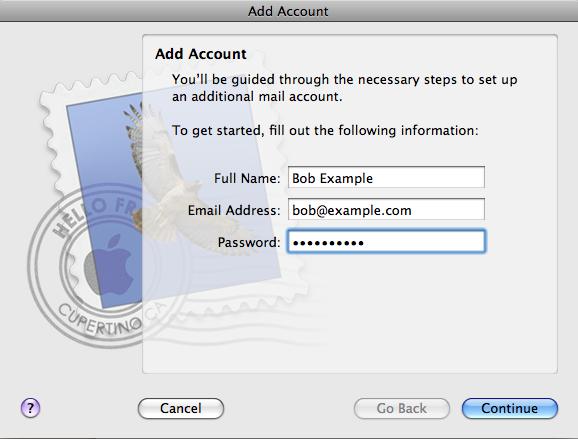
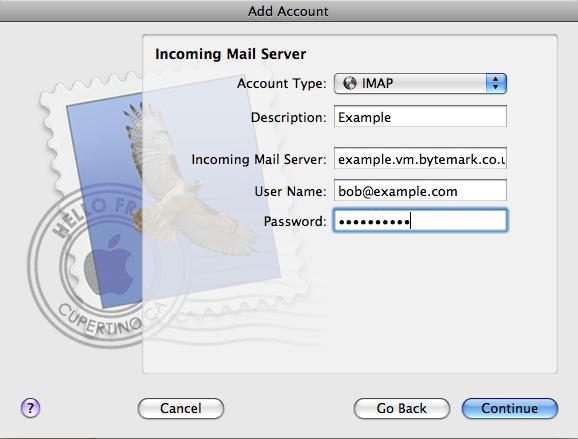
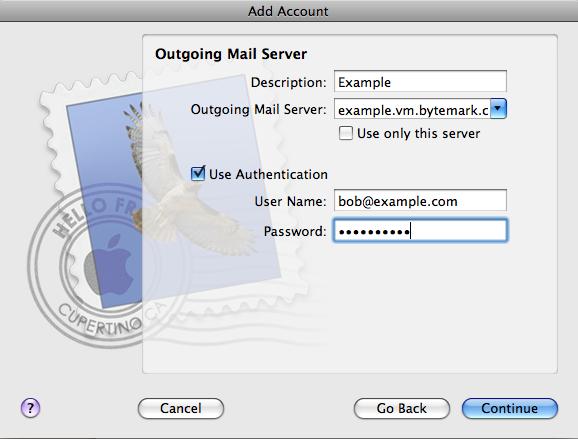
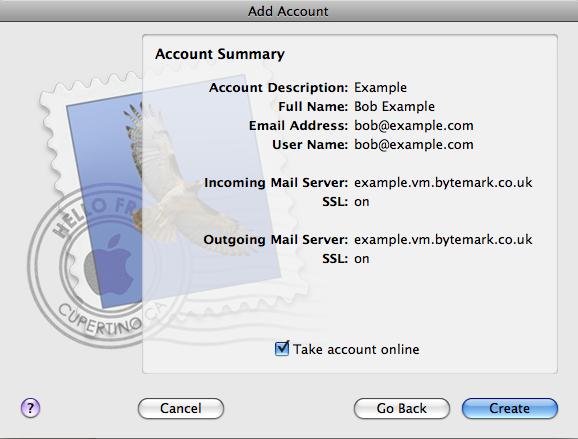
Version 1.3, 3 November 2008
Copyright © 2000, 2001, 2002, 2007, 2008 Free Software Foundation, Inc.
Everyone is permitted to copy and distribute verbatim copies of this license document, but changing it is not allowed.
0. PREAMBLE
The purpose of this License is to make a manual, textbook, or other functional and useful document “free” in the sense of freedom: to assure everyone the effective freedom to copy and redistribute it, with or without modifying it, either commercially or noncommercially. Secondarily, this License preserves for the author and publisher a way to get credit for their work, while not being considered responsible for modifications made by others.
This License is a kind of “copyleft”, which means that derivative works of the document must themselves be free in the same sense. It complements the GNU General Public License, which is a copyleft license designed for free software.
We have designed this License in order to use it for manuals for free software, because free software needs free documentation: a free program should come with manuals providing the same freedoms that the software does. But this License is not limited to software manuals; it can be used for any textual work, regardless of subject matter or whether it is published as a printed book. We recommend this License principally for works whose purpose is instruction or reference.
1. APPLICABILITY AND DEFINITIONS
This License applies to any manual or other work, in any medium, that contains a notice placed by the copyright holder saying it can be distributed under the terms of this License. Such a notice grants a world-wide, royalty-free license, unlimited in duration, to use that work under the conditions stated herein. The “Document”, below, refers to any such manual or work. Any member of the public is a licensee, and is addressed as “you”. You accept the license if you copy, modify or distribute the work in a way requiring permission under copyright law.
A “Modified Version” of the Document means any work containing the Document or a portion of it, either copied verbatim, or with modifications and/or translated into another language.
A “Secondary Section” is a named appendix or a front-matter section of the Document that deals exclusively with the relationship of the publishers or authors of the Document to the Document’s overall subject (or to related matters) and contains nothing that could fall directly within that overall subject. (Thus, if the Document is in part a textbook of mathematics, a Secondary Section may not explain any mathematics.) The relationship could be a matter of historical connection with the subject or with related matters, or of legal, commercial, philosophical, ethical or political position regarding them.
The “Invariant Sections” are certain Secondary Sections whose titles are designated, as being those of Invariant Sections, in the notice that says that the Document is released under this License. If a section does not fit the above definition of Secondary then it is not allowed to be designated as Invariant. The Document may contain zero Invariant Sections. If the Document does not identify any Invariant Sections then there are none.
The “Cover Texts” are certain short passages of text that are listed, as Front-Cover Texts or Back-Cover Texts, in the notice that says that the Document is released under this License. A Front-Cover Text may be at most 5 words, and a Back-Cover Text may be at most 25 words.
A “Transparent” copy of the Document means a machine-readable copy, represented in a format whose specification is available to the general public, that is suitable for revising the document straightforwardly with generic text editors or (for images composed of pixels) generic paint programs or (for drawings) some widely available drawing editor, and that is suitable for input to text formatters or for automatic translation to a variety of formats suitable for input to text formatters. A copy made in an otherwise Transparent file format whose markup, or absence of markup, has been arranged to thwart or discourage subsequent modification by readers is not Transparent. An image format is not Transparent if used for any substantial amount of text. A copy that is not “Transparent” is called “Opaque”.
Examples of suitable formats for Transparent copies include plain ASCII without markup, Texinfo input format, LaTeX input format, SGML or XML using a publicly available DTD, and standard-conforming simple HTML, PostScript or PDF designed for human modification. Examples of transparent image formats include PNG, XCF and JPG. Opaque formats include proprietary formats that can be read and edited only by proprietary word processors, SGML or XML for which the DTD and/or processing tools are not generally available, and the machine-generated HTML, PostScript or PDF produced by some word processors for output purposes only.
The “Title Page” means, for a printed book, the title page itself, plus such following pages as are needed to hold, legibly, the material this License requires to appear in the title page. For works in formats which do not have any title page as such, “Title Page” means the text near the most prominent appearance of the work’s title, preceding the beginning of the body of the text.
The “publisher” means any person or entity that distributes copies of the Document to the public.
A section “Entitled XYZ” means a named subunit of the Document whose title either is precisely XYZ or contains XYZ in parentheses following text that translates XYZ in another language. (Here XYZ stands for a specific section name mentioned below, such as “Acknowledgements”, “Dedications”, “Endorsements”, or “History”.) To “Preserve the Title” of such a section when you modify the Document means that it remains a section “Entitled XYZ” according to this definition.
The Document may include Warranty Disclaimers next to the notice which states that this License applies to the Document. These Warranty Disclaimers are considered to be included by reference in this License, but only as regards disclaiming warranties: any other implication that these Warranty Disclaimers may have is void and has no effect on the meaning of this License.
2. VERBATIM COPYING
You may copy and distribute the Document in any medium, either commercially or noncommercially, provided that this License, the copyright notices, and the license notice saying this License applies to the Document are reproduced in all copies, and that you add no other conditions whatsoever to those of this License. You may not use technical measures to obstruct or control the reading or further copying of the copies you make or distribute. However, you may accept compensation in exchange for copies. If you distribute a large enough number of copies you must also follow the conditions in section 3.
You may also lend copies, under the same conditions stated above, and you may publicly display copies.
3. COPYING IN QUANTITY
If you publish printed copies (or copies in media that commonly have printed covers) of the Document, numbering more than 100, and the Document’s license notice requires Cover Texts, you must enclose the copies in covers that carry, clearly and legibly, all these Cover Texts: Front-Cover Texts on the front cover, and Back-Cover Texts on the back cover. Both covers must also clearly and legibly identify you as the publisher of these copies. The front cover must present the full title with all words of the title equally prominent and visible. You may add other material on the covers in addition. Copying with changes limited to the covers, as long as they preserve the title of the Document and satisfy these conditions, can be treated as verbatim copying in other respects.
If the required texts for either cover are too voluminous to fit legibly, you should put the first ones listed (as many as fit reasonably) on the actual cover, and continue the rest onto adjacent pages.
If you publish or distribute Opaque copies of the Document numbering more than 100, you must either include a machine-readable Transparent copy along with each Opaque copy, or state in or with each Opaque copy a computer-network location from which the general network-using public has access to download using public-standard network protocols a complete Transparent copy of the Document, free of added material. If you use the latter option, you must take reasonably prudent steps, when you begin distribution of Opaque copies in quantity, to ensure that this Transparent copy will remain thus accessible at the stated location until at least one year after the last time you distribute an Opaque copy (directly or through your agents or retailers) of that edition to the public.
It is requested, but not required, that you contact the authors of the Document well before redistributing any large number of copies, to give them a chance to provide you with an updated version of the Document.
4. MODIFICATIONS
You may copy and distribute a Modified Version of the Document under the conditions of sections 2 and 3 above, provided that you release the Modified Version under precisely this License, with the Modified Version filling the role of the Document, thus licensing distribution and modification of the Modified Version to whoever possesses a copy of it. In addition, you must do these things in the Modified Version:
- Use in the Title Page (and on the covers, if any) a title distinct from that of the Document, and from those of previous versions (which should, if there were any, be listed in the History section of the Document). You may use the same title as a previous version if the original publisher of that version gives permission.
- List on the Title Page, as authors, one or more persons or entities responsible for authorship of the modifications in the Modified Version, together with at least five of the principal authors of the Document (all of its principal authors, if it has fewer than five), unless they release you from this requirement.
- State on the Title page the name of the publisher of the Modified Version, as the publisher.
- Preserve all the copyright notices of the Document.
- Add an appropriate copyright notice for your modifications adjacent to the other copyright notices.
- Include, immediately after the copyright notices, a license notice giving the public permission to use the Modified Version under the terms of this License, in the form shown in the Addendum below.
- Preserve in that license notice the full lists of Invariant Sections and required Cover Texts given in the Document’s license notice.
- Include an unaltered copy of this License.
- Preserve the section Entitled “History”, Preserve its Title, and add to it an item stating at least the title, year, new authors, and publisher of the Modified Version as given on the Title Page. If there is no section Entitled “History” in the Document, create one stating the title, year, authors, and publisher of the Document as given on its Title Page, then add an item describing the Modified Version as stated in the previous sentence.
- Preserve the network location, if any, given in the Document for public access to a Transparent copy of the Document, and likewise the network locations given in the Document for previous versions it was based on. These may be placed in the “History” section. You may omit a network location for a work that was published at least four years before the Document itself, or if the original publisher of the version it refers to gives permission.
- For any section Entitled “Acknowledgements” or “Dedications”, Preserve the Title of the section, and preserve in the section all the substance and tone of each of the contributor acknowledgements and/or dedications given therein.
- Preserve all the Invariant Sections of the Document, unaltered in their text and in their titles. Section numbers or the equivalent are not considered part of the section titles.
- Delete any section Entitled “Endorsements”. Such a section may not be included in the Modified Version.
- Do not retitle any existing section to be Entitled “Endorsements” or to conflict in title with any Invariant Section.
- Preserve any Warranty Disclaimers.
If the Modified Version includes new front-matter sections or appendices that qualify as Secondary Sections and contain no material copied from the Document, you may at your option designate some or all of these sections as invariant. To do this, add their titles to the list of Invariant Sections in the Modified Version’s license notice. These titles must be distinct from any other section titles.
You may add a section Entitled “Endorsements”, provided it contains nothing but endorsements of your Modified Version by various parties — for example, statements of peer review or that the text has been approved by an organization as the authoritative definition of a standard.
You may add a passage of up to five words as a Front-Cover Text, and a passage of up to 25 words as a Back-Cover Text, to the end of the list of Cover Texts in the Modified Version. Only one passage of Front-Cover Text and one of Back-Cover Text may be added by (or through arrangements made by) any one entity. If the Document already includes a cover text for the same cover, previously added by you or by arrangement made by the same entity you are acting on behalf of, you may not add another; but you may replace the old one, on explicit permission from the previous publisher that added the old one.
The author(s) and publisher(s) of the Document do not by this License give permission to use their names for publicity for or to assert or imply endorsement of any Modified Version.
5. COMBINING DOCUMENTS
You may combine the Document with other documents released under this License, under the terms defined in section 4 above for modified versions, provided that you include in the combination all of the Invariant Sections of all of the original documents, unmodified, and list them all as Invariant Sections of your combined work in its license notice, and that you preserve all their Warranty Disclaimers.
The combined work need only contain one copy of this License, and multiple identical Invariant Sections may be replaced with a single copy. If there are multiple Invariant Sections with the same name but different contents, make the title of each such section unique by adding at the end of it, in parentheses, the name of the original author or publisher of that section if known, or else a unique number. Make the same adjustment to the section titles in the list of Invariant Sections in the license notice of the combined work.
In the combination, you must combine any sections Entitled “History” in the various original documents, forming one section Entitled “History”; likewise combine any sections Entitled “Acknowledgements”, and any sections Entitled “Dedications”. You must delete all sections Entitled “Endorsements”.
6. COLLECTIONS OF DOCUMENTS
You may make a collection consisting of the Document and other documents released under this License, and replace the individual copies of this License in the various documents with a single copy that is included in the collection, provided that you follow the rules of this License for verbatim copying of each of the documents in all other respects.
You may extract a single document from such a collection, and distribute it individually under this License, provided you insert a copy of this License into the extracted document, and follow this License in all other respects regarding verbatim copying of that document.
7. AGGREGATION WITH INDEPENDENT WORKS
A compilation of the Document or its derivatives with other separate and independent documents or works, in or on a volume of a storage or distribution medium, is called an “aggregate” if the copyright resulting from the compilation is not used to limit the legal rights of the compilation’s users beyond what the individual works permit. When the Document is included in an aggregate, this License does not apply to the other works in the aggregate which are not themselves derivative works of the Document.
If the Cover Text requirement of section 3 is applicable to these copies of the Document, then if the Document is less than one half of the entire aggregate, the Document’s Cover Texts may be placed on covers that bracket the Document within the aggregate, or the electronic equivalent of covers if the Document is in electronic form. Otherwise they must appear on printed covers that bracket the whole aggregate.
8. TRANSLATION
Translation is considered a kind of modification, so you may distribute translations of the Document under the terms of section 4. Replacing Invariant Sections with translations requires special permission from their copyright holders, but you may include translations of some or all Invariant Sections in addition to the original versions of these Invariant Sections. You may include a translation of this License, and all the license notices in the Document, and any Warranty Disclaimers, provided that you also include the original English version of this License and the original versions of those notices and disclaimers. In case of a disagreement between the translation and the original version of this License or a notice or disclaimer, the original version will prevail.
If a section in the Document is Entitled “Acknowledgements”, “Dedications”, or “History”, the requirement (section 4) to Preserve its Title (section 1) will typically require changing the actual title.
9. TERMINATION
You may not copy, modify, sublicense, or distribute the Document except as expressly provided under this License. Any attempt otherwise to copy, modify, sublicense, or distribute it is void, and will automatically terminate your rights under this License.
However, if you cease all violation of this License, then your license from a particular copyright holder is reinstated (a) provisionally, unless and until the copyright holder explicitly and finally terminates your license, and (b) permanently, if the copyright holder fails to notify you of the violation by some reasonable means prior to 60 days after the cessation.
Moreover, your license from a particular copyright holder is reinstated permanently if the copyright holder notifies you of the violation by some reasonable means, this is the first time you have received notice of violation of this License (for any work) from that copyright holder, and you cure the violation prior to 30 days after your receipt of the notice.
Termination of your rights under this section does not terminate the licenses of parties who have received copies or rights from you under this License. If your rights have been terminated and not permanently reinstated, receipt of a copy of some or all of the same material does not give you any rights to use it.
10. FUTURE REVISIONS OF THIS LICENSE
The Free Software Foundation may publish new, revised versions of the GNU Free Documentation License from time to time. Such new versions will be similar in spirit to the present version, but may differ in detail to address new problems or concerns. See Copyleft.
Each version of the License is given a distinguishing version number. If the Document specifies that a particular numbered version of this License “or any later version” applies to it, you have the option of following the terms and conditions either of that specified version or of any later version that has been published (not as a draft) by the Free Software Foundation. If the Document does not specify a version number of this License, you may choose any version ever published (not as a draft) by the Free Software Foundation. If the Document specifies that a proxy can decide which future versions of this License can be used, that proxy’s public statement of acceptance of a version permanently authorizes you to choose that version for the Document.
11. RELICENSING
“Massive Multiauthor Collaboration Site” (or “MMC Site”) means any World Wide Web server that publishes copyrightable works and also provides prominent facilities for anybody to edit those works. A public wiki that anybody can edit is an example of such a server. A “Massive Multiauthor Collaboration” (or “MMC”) contained in the site means any set of copyrightable works thus published on the MMC site.
“CC-BY-SA” means the Creative Commons Attribution-Share Alike 3.0 license published by Creative Commons Corporation, a not-for-profit corporation with a principal place of business in San Francisco, California, as well as future copyleft versions of that license published by that same organization.
“Incorporate” means to publish or republish a Document, in whole or in part, as part of another Document.
An MMC is “eligible for relicensing” if it is licensed under this License, and if all works that were first published under this License somewhere other than this MMC, and subsequently incorporated in whole or in part into the MMC, (1) had no cover texts or invariant sections, and (2) were thus incorporated prior to November 1, 2008.
The operator of an MMC Site may republish an MMC contained in the site under CC-BY-SA on the same site at any time before August 1, 2009, provided the MMC is eligible for relicensing.
ADDENDUM: How to use this License for your documents
To use this License in a document you have written, include a copy of the License in the document and put the following copyright and license notices just after the title page:
Copyright © YEAR YOUR NAME

Permission is granted to copy, distribute and/or modify this document under the
terms of the GNU Free Documentation License, Version 1.3 or any later version
published by the Free Software Foundation; with no Invariant Sections, no
Front-Cover Texts, and no Back-Cover Texts. A copy of the license is included in
the section entitled “GNU Free Documentation License”.
If you have Invariant Sections, Front-Cover Texts and Back-Cover Texts, replace the “with… Texts.” line with this:
with the Invariant Sections being LIST THEIR TITLES, with the Front-Cover Texts
being LIST, and with the Back-Cover Texts being LIST.
If you have Invariant Sections without Cover Texts, or some other combination of the three, merge those two alternatives to suit the situation.
If your document contains nontrivial examples of program code, we recommend releasing these examples in parallel under your choice of free software license, such as the GNU General Public License, to permit their use in free software.
- BSD, Berkeley System Distribution
A family of Unix versions developed by Bill Joy and others at the University of California at Berkeley, originally for the DEC VAX and PDP-11 computers, and subsequently ported to almost all modern general-purpose computers. BSD Unix incorporates paged virtual memory, TCP/IP networking enhancements and many other features [FOLDOC].
- DNS, Domain Name System
This system is used to convert IP Addresses into hostnames. It is also used to determine where mail should be routed for a domain.
- FTP, File Transfer Protocol
FTP used to be used to transfer large files over the internet. It is an archaic protocol.
- HTML, Hypertext Markup Language
A system to mark up documents. It is the most common format used for documents on the world-wide web, and is the format that web browsers display.
- HTTP, Hypertext Transfer Protocol
This protocol was originally used to transfer HTML documents between machines connected to the internet. It has become the standard protocol for transferring all types of documents over the world-wide web.
- IMAP, Internet Message Access Protocol
The Internet Message Access Protocol (IMAP) is one of the two most prevalent Internet standard protocols for e-mail retrieval, the other being the Post Office Protocol (POP). Virtually all modern e-mail clients and mail servers support both protocols as a means of transferring e-mail messages from a server.
- IP, Internet Protocol
The network layer for the TCP/IP protocol suite widely used on Ethernet networks, defined in STD 5, RFC 791. IP is a connectionless, best-effort packet switching protocol. It provides packet routing, fragmentation and re-assembly through the data link layer.
+ IPv4 is the version in widespread use and IPv6 was just beginning to come into use in 2000 but is still not widespread by 2008 [FOLDOC].
- IP Address
Unless IPv6 is specified, at present, IPv4 is assummed. An IPv4 address is a 4 byte number generally represented as a dotted quad e.g. 89.16.174.65.
- ISP, Internet Service Provider
A company which provides other companies or individuals with access to, or presence on, the Internet. Most ISPs are also Internet Access Providers; extra services include help with design, creation and administration of World-Wide Web sites, training and administration of intranets and domain name registration [FOLDOC].
- MTA, Mail Transfer Agent
A mail transfer agent is a computer process or software agent that transfers electronic mail messages from one computer to another, in single hop application-level transactions. A MTA implements both the client (sending) and server (receiving) portions of the Simple Mail Transfer Protocol.
- NTP, Network Time Protocol
A protocol built on top of TCP/IP that assures accurate local timekeeping with reference to radio, atomic or other clocks located on the Internet. This protocol is capable of synchronizing distributed clocks within milliseconds over long time periods.[FOLDOC].
- PHP
PHP is a widely-used general-purpose scripting language that is especially suited for Web development and can be embedded into HTML. [PHPNET]
- POP3, Post Office Protocol 3
Version 3 of the Post Office Protocol. POP3 is defined in RFC 1081, written in November 1988 by Marshall Rose, which is based on RFC 918 (since revised as RFC 937). POP3 allows a client computer to retrieve electronic mail from a POP3 server via a (temporary) TCP/IP or other[?] connection. It does not provide for sending mail, which is assumed to be done via SMTP or some other method [FOLDOC].
- Secure File Transfer Protocol, SFTP
SFTP is a file transfer protocol which involves using an SSH server to manage the file uploads. It is secure in the sense that file contents are encrypted during transfer, and that plain-text passwords are never sent over the internet. SFTP is the logical successor to FTP, which is less secure, and more complex to firewall.
- SMTP, Simple Mail Transfer Protocol
A protocol defined in STD 10, RFC 821, used to transfer electronic mail between computers, usually over Ethernet. It is a server to server protocol, so other protocols are used to access the messages [FOLDOC].
- SSH, Secure Shell
A Unix shell program for logging into, and executing commands on, a remote computer. ssh is intended to replace rlogin and rsh, and provide secure encrypted communications between two untrusted hosts over an insecure network. X11 connections and arbitrary TCP/IP ports can also be forwarded over the secure channel [FOLDOC].
- SSL, Secure Sockets Layer
A protocol designed by Netscape Communications Corporation to provide secure communications over the Internet using asymmetric key encryption. SSL is layered beneath application protocols such as HTTP, SMTP, Telnet, FTP, Gopher and NNTP and is layered above the connection protocol TCP/IP. It is used by the HTTPS access method [FOLDOC].
- TCP, Transmission Control Protocol
The most common transport layer protocol used on Ethernet and the Internet. It was developed by DARPA.
TCP is the connection-oriented protocol built on top of Internet Protocol (IP) and is nearly always seen in the combination TCP/IP (TCP over IP). It adds reliable communication and flow-control and provides full-duplex, process-to-process connections.
TCP is defined in STD 7 and RFC 793 [FOLDOC].
- TLS, Transport Layer Security
A protocol designed to allow client/server applications to communicate over the Internet without eavesdropping, tampering, or message forgery.
TLS is defined in RFC 2246 [FOLDOC].
- UDP, User Datagram Protocol
Internet standard network layer, transport layer and session layer protocols which provide simple but unreliable datagram services. UDP is defined in STD 6, RFC 768. It adds a checksum and additional process-to-process addressing information [to what?]. UDP is a connectionless protocol which, like TCP, is layered on top of IP.
UDP neither guarantees delivery nor does it require a connection. As a result it is lightweight and efficient, but all error processing and retransmission must be taken care of by the application program [FOLDOC].
- URL, Uniform Resource Locator
A Uniform Resource Locator (URL) is a Uniform Resource Identifier (URI) that specifies where an identified resource is available and the mechanism for retrieving it. In popular usage and in many technical documents and verbal discussions it is often incorrectly used as a synonym for URI. The best-known example of a URL is the "address" of a web page e.g. http://www.example.com [WIKIPEDIA_URL].
[FOLDOC] Denis Howe (ed). ‘The Free On-line Dictionary of Computing’, http://foldoc.org/
[PHPNET] The PHP Group. ‘PHP: Hypertext Preprocessor’, http://php.net/
[WIKIPEDIA_URL] Wikipedia contributors. ‘Uniform Resource Locator’, Wikipedia, The Free Encyclopedia. http://en.wikipedia.org/w/index.php?title=Uniform_Resource_Locator&oldid=367676813 (downloaded 2010-06-10).
B
- Backups, Automated backups
- Offsite storage, Offsite backups
C
- CGI scripts, CGI scripts
- Connecting
- Crontab
- format, The crontab format
- Output, Mailing the output
- Testing, Testing the crontab
- using, Scheduled tasks
D
- Database
- adding a remote user, Adding a user with remote privileges
- enabling remote access, Enabling remote MySQL access
- opening the firewall for, Opening the firewall for MySQL
- root password, Database configuration
- DNS records
- Bytemark anti-spam service, Using the Bytemark anti-spam system
- hostname wild-card, Adding a wild-card hostname record
- template for, Default DNS records
- Domains
- adding, Hosting a web page using your own domain
- moving between machines, Moving domains between machines using the Bytemark content DNS service
- testing, Testing a new domain
- wildcards, Handling wildcard domains
E
- catching all, Accepting email for a domain
- configuration layout, Configuration layout
- not accepting any, Accepting email for a domain
- push notification, Configuring email clients
F
- FileZilla
- Common recipes, Common FileZilla recipes
- Connecting using, Connecting using FileZilla
- Creating a remote directory, Creating a remote directory
- Creating a remote file, Creating a remote file
- Deleting files and directories, Deleting files and directories
- Navigating local and remote filesystems, Navigating local and remote filesystems
- firewall
- automatic blacklisting of abusing connections, Disabling the blacklist functionality
- disabling the, Disabling the firewall
- FTP Access, Setting up FTP Access
- FTP access
- setting the password, Setting up FTP Access
- testing, Setting up FTP Access
M
- MySQL
- adding a remote user, Adding a user with remote privileges
- enabling remote access, Enabling remote MySQL access
- managing, Managing the MySQL database
- opening the firewall for, Opening the firewall for MySQL
- root password, Database configuration
P
- phpMyAdmin
- connecting to MySQL, Managing the MySQL database
- PuTTY
- connecting to your machine using, Using PuTTY to connect via SSH
S
- Security, Keeping Your System Secure
- Avoid weak passwords, Avoiding weak passwords
- Check system email notices, Checking system notifications
- Keep your software current, Keep your software current
- SquirrelMail
- logging in, Testing a new mailbox, via webmail
- SSH
- connecting to your machine using PuTTY, Using PuTTY to connect via SSH
- SSL
- Certificate generation, Generating an SSL certificate key and request
- SSL certificates
- encryption using, SSL Configuration
- purchasing, SSL Configuration
- self-signed, SSL Configuration
- verifying, SSL Configuration
- trusting, SSL Configuration
- SSL Hosting, Configuring SSL Hosting
- Symbiosis
- Command-line access, What about command-line access?
- Features, The Bytemark Symbiosis system
- Included software, What software does Symbiosis come with?
- Open Source, Is Symbiosis open-source?
- Web interface, Is there a web interface?
W
- Web pages
- default, Website setup
- testing, Testing a new domain
- uploading, Website setup
- Web site statistics
- customising, Statistics
- disabling, Statistics
- Webmail
- logging in to, Testing a new mailbox, via webmail
- Website
- Configuration, Website Configuration
- Layout, Web configuration layout
- Statistics, Statistics
- Testing new sites, Testing new websites