Table of Contents
Symbiosis will install well on a freshly-installed Debian 9.0 system. Currently it is only available for i386 and amd64 architectures, running on the Linux kernel.
It is designed to be as friendly as possible for beginners, whilst maintaining flexibility for more experienced systems administrators. Later in this chapter we’ll spell out a few basics to bear in mind when working with a system running Symbiosis.
Installing on a fresh Stretch system is relatively simple. First, add the Bytemark package signing key:
curl -sSL https://secure.bytemark.co.uk/key/repositories-2014.key | sudo apt-key add -
Second, add the following to /etc/apt/sources.list.d/symbiosis.list:
#
# Bytemark Symbiosis Packages
#
deb     http://symbiosis.bytemark.co.uk/stretch/ ./
deb-src http://symbiosis.bytemark.co.uk/stretch/ ./
Once that is in your sources, run:
apt-get update
apt-get install --install-recommends bytemark-symbiosis
At the end of this process, you should have a fully functioning Symbiosis system with all of the features documented here available to you for use.
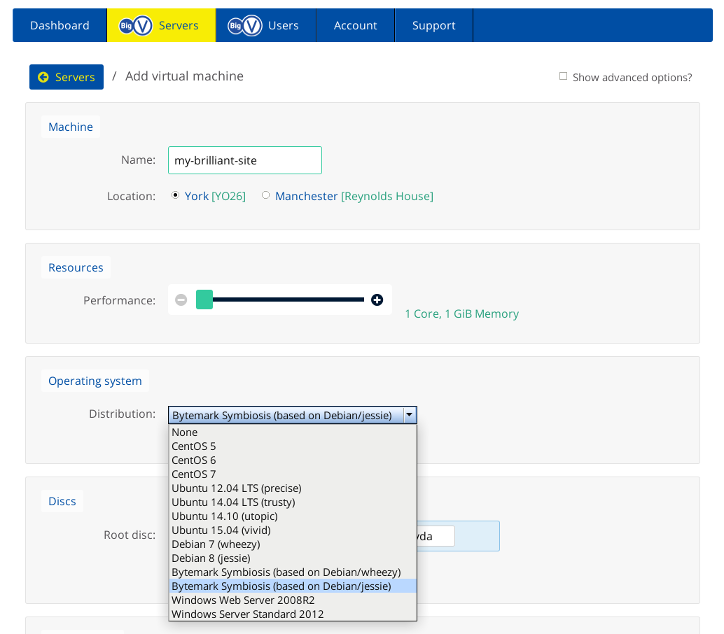
Users of Bytemark’s Cloud Servers can get a fresh install of Symbiosis by
simply selecting the image at VM install time. The panel is accessed at
https://panel.bytemark.co.uk. Once logged in, using the Add a cloud server
button, a machine can be installed within a few seconds. Select the Stretch Symbiosis
image as per the screenshot below.
Debian have comprehensive release notes, of which chapter 4 covers the recommended upgrade procedure. We have provided a shorter version for this, which is immediately below:
The first thing to do is make sure that you have backups. These should be kept in /var/backups/localhost, and they should be up to date.
Note
Any modifications you may have made to Symbiosis scripts will likely be lost during the upgrade, so you should be prepared to reapply these changes after the upgrade.
Next, alter /etc/apt/sources.list. Change all instances of the word
jessie to stretch. If you have backports, you can remove them, and
any entries for Jessie LTS should also be removed. Then change the
Symbiosis repository lines to match those shown in the previous
section.
You can then proceed with the upgrade by running:
apt-get update
apt-get dist-upgrade
Following the upgrade, to use PHP7 you will need to disable and enable the appropriate Apache modules:
a2dismod php5
a2enmod php7.0
systemctl restart apache2
You can swap back at any time by disabling the php7.0 module and enabling the php5 module instead.
The updated version of Roundcube relies on PHP7.0 by default. If you
would like to continue using PHP5, you will need to install the
php-net-idna2 package by running:
apt-get install php-net-idna2
As this is an upgrade for all the software on the system, a large number of questions may be asked about configuration files during the upgrade. Some of these will relate to packages Symbiosis has installed as dependencies, and the answers to these questions are given below.
Questions asked during the upgrade
- Q: Configuring roundcube-core: Configure database for roundcube with dbconfig-common?
- Q: Configuring roundcube-core: Database type to be used by roundcube
- Q: Configuring roundcube-core: Host running the server for roundcube
- Q: Configuring roundcube-core: Password of the database’s administrative user
- Q: Configuring roundcube-core: MySQL application password for roundcube
- Q: Configuring phpmyadmin: Configure database for phpmyadmin with dbconfig-common?
- Q: Configuring phpmyadmin: Host running the MySQL server for phpmyadmin
- Q: Configuring phpmyadmin: Web server to reconfigure automatically
- Q: Configuring libc6:amd64: Restart services during package upgrades without asking?
- Q: Configuration file /etc/sysctl.conf modified since installation
- Q: Configuring openssh-server
- Q: Configuring grub-pc
- Q: Configuration file /etc/ntp.conf modified since installation
- Q: Configuration file /etc/phpmyadmin/config.inc.php modified since installation
- Q: Configuring phpmyadmin: Perform upgrade on database for phpmyadmin with dbconfig-common?
- Q: Configuring unattended-upgrades
That should be everything; you may have been asked other questions if you have installed extra packages on your system - answer them as you see fit.
This release of Symbiosis includes a number of new features that are summarised in Chapter 1, What’s new since the last release.
Apache has undergone a significant version change in Stretch. If you’ve made any custom Apache config changes, you may need to look at the docs. As of 2.4.17, HTTP2 is supported. Further information is available here.
The version of PHP included with Symbiosis Stretch has been upgraded to 7.0 from 5.6. This new version is enabled by default on both new installations, and following a dist-upgrade. Further information on the changes between 5.6 and 7.0 is available here.
Each component that makes up Symbiosis is separately packaged as follows. Each package can be installed individually if needed.
- bytemark-symbiosis
- Meta-package that pulls in the core requirements for a Symbiosis system, and as well as recommending all packages needed for a complete Symbiosis system.
- symbiosis-backup
- Organises and configures backup2l to backup vital parts of the system, and rsync them to a remote location.
- symbiosis-common
- Contains the core libraries that Symbiosis uses to operate.
- symbiosis-dns
- Adds automatic DNS generation and upload to the system. Ties in with the Bytemark DNS service.
- symbiosis-email
- Configures Exim and Dovecot for use with Symbiosis.
- symbiosis-email-activesync
- - Provides email access using the Microsoft Exchange ActiveSync protocol
- symbiosis-firewall
- Maintains the iptables and ip6tables firewalls, as well as providing automatic blacklisting and whitelisting.
- symbiosis-ftpd
- Configures pure-ftpd to work with Symbiosis.
- symbiosis-httpd
- Configures the Apache web server.
- symbiosis-key
- Adds the Bytemark Symbiosis key to apt.
- symbiosis-monit
- Provides service monitoring.
- symbiosis-mysql
- Brings in MariaDB version 10.1, and configures it to bind to all interfaces, not just localhost, for remote access. MariaDB is a fork of MySQL, and is designed to be a drop-in replacement.
- symbiosis-pam
- Brings in two PAM dependencies to make the system more secure — one checks passwords and warns when they are weak, the other sets per-user temporary directories.
- symbiosis-phpmyadmin
- Brings in phpMyAdmin, and configures it to use HTTP authentication.
- symbiosis-webmail
- Adds webmail functionality, using Roundcube. Includes one additional package:
- symbiosis-webmail-roundcube
- Provide webmail access to Symbiosis using Roundcube
- symbiosis-xmpp
- Adds an XMPP server, which can be used to chat to people on the global XMPP network.
Symbiosis is an attempt to encourage best practice at all times in systems administration, whilst keeping things as simple as possible, and free of surprises. As a result there are a few general rules to bear in mind when tinkering with your system.
As far as possible Symbiosis will discourage you from using root
when logging in and configuring the system. This primarily applies to
-
Anything in the
/srv/directory -
The firewall configuration in
/etc/symbiosis/firewall
For example, if a directory in /srv is owned by a system
user or group, i.e. one with a UID/GID less than 1000, then it will
not show up to various tasks, including, but not limited to,
- Email and FTP logins
-
Cron tasks in
config/crontab -
Apache logging to
public/logs/ - Mail delivery to mailboxes.
In short, try not to use root if at all possible.
However it is perfectly possible to configure separate domains in
/srv/ to be owned by different users, as long as they are
non-system users, i.e. ones with user IDs greater than 1000. All
programs will respect these permissions.
Lots of configuration on the system is automatically generated to make Symbiosis work as it does. In previous releases of Symbiosis this meant that files would get overwritten without notice. However as of the Squeeze release in February 2012 configuration files are handled more conservatively.
Two things to watch out for. If a configuration file has
# DO NOT EDIT THIS FILE - CHANGES WILL BE OVERWRITTEN
written in it, then there is a high chance that any changes will be overwritten. It has to be the exact wording and spacing above for overwriting to take place, so if that sentence is removed from the configuration then it will not get overwritten.
Similarly many files are generated from templates, for example DNS and apache snippets. These will now have a checksum at the bottom of the file.
# Checksum MD5 586732ff59e60115d0ec1c4905c72773
This checksum allows Symbiosis scripts to establish if the template
used to generate the snippet has changed, if the data used in the
generation has changed, or if the file itself has been edited. For
example if an IP address is changed by editing config/ip, then that
would allow the apache snippet for that domain can be updated, as can
the DNS snippet.
This also means that sysadmins can edit the templates, and allow them to regenerate, or edit the snippets themselves safe in the knowledge that their changes will not get overwritten.
The Backup2l, Dovecot, and Exim configuration files are generated not with a template, but with a collection of snippets, which are joined and checked using a Makefile. This allows extra configuration snippets to be added in to the configuration.
If it is deemed necessary, sysadmins can add extra snippets to these configurations. The basic procedure is to read the configuration file, and decide where the extra directives need to go. This is made easier by the fact that through the configuration files comments are added showing where each part comes from.
# ------------------------------------------------------------------------------
# /etc/exim4/symbiosis.d/10-acl/40-acl-check-mail/00-header
# ------------------------------------------------------------------------------

# ACL that is used after the MAIL command
acl_check_mail:

# ------------------------------------------------------------------------------
# /etc/exim4/symbiosis.d/10-acl/40-acl-check-mail/90-default
# ------------------------------------------------------------------------------

# Allow anything not already denied to connect
  accept
In this example, if an extra directive were required in this ACL,
then a file could be created in
/etc/exim4/symbiosis.d/10-acl/40-acl-check-mail/, maybe
with the filename 10-do-stuff. To create the new configuration,
we’d then need to run make in /etc/exim4/. This would
regenerate /etc/exim4/exim4.conf, and perform a basic syntax check.
If happy with the new configuration, then exim4 could be restarted.
The equivalent Dovecot configuration is in /etc/dovecot/symbiosis.d/
which generates /etc/dovecot/dovecot.conf. The Backup2l
configuration is in /etc/symbiosis/backup.d/conf.d/, which
generates /etc/symbiosis/backup.d/backup2l.conf.