Table of Contents
Before you start this chapter
- Connect to your server over SFTP using FileZilla (see Chapter 3, Connecting to your server with FileZilla and SFTP).
- Set up a website (see Chapter 4, Website setup).
Fast forward to the scenario where you have a web hosting client who has designed their own site and would like to upload it themselves. However it is not necessary to grant them access to all domains on the machine, or even the config or mailboxes section of their own domain.
This is typical for a shared hosting client, and the solution
is to give them FTP access. This limits them to the
files inside the public/ directory, i.e. only those
associated with the website.
Warning
Please be aware that despite being limited to the public/
directory when logging in over FTP, it is trivial for the user to read
files elsewhere on the filesystem, for example by using specially
written PHP scripts. It is advisable to grant access only to trusted
people.
In this example, access to the content of the my-brilliant-site.com
site is being given to another user, but they are only to have access
to /srv/my-brilliant-site.com/public/. To set this up,
an FTP password is being created.
Connect to your machine using FileZilla.
Navigate to
/srv/my-brilliant-site.com/config/Create a file
ftp-passworda that contains a secure password your shared hosting client will use, ensure that theconfig/directory is selected b and upload the file, c. Make sure that there is no txt extension on this file.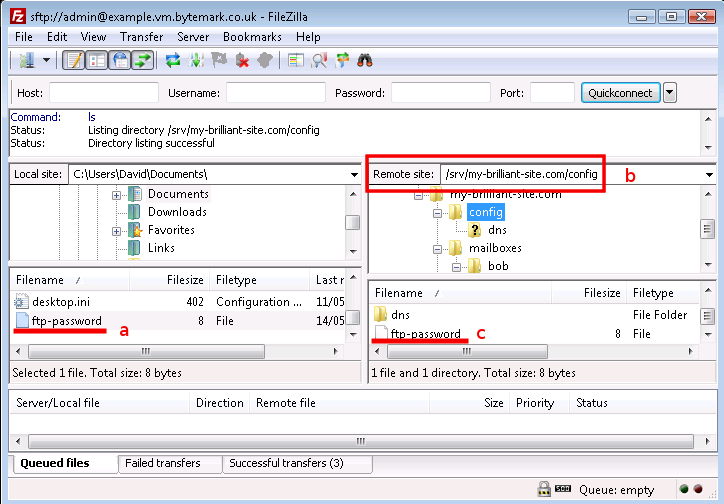
Now that is all that is needed. Access to the machine can now be
granted over FTP using the username my-brilliant-site.com and the
password being the contents of
/srv/my-brilliant-site.com/config/ftp-password.
We will now test the connection to make sure it works, also using FileZilla, since it can be used to connect via FTP as well as SFTP.
Make sure FileZilla has disconnected from the machine.
The host a and the user b are both the domain name, in this case my-brilliant-site.com. The password c is the contents of the
ftp-passwordfile and for FTP the port number must be set to 21, d.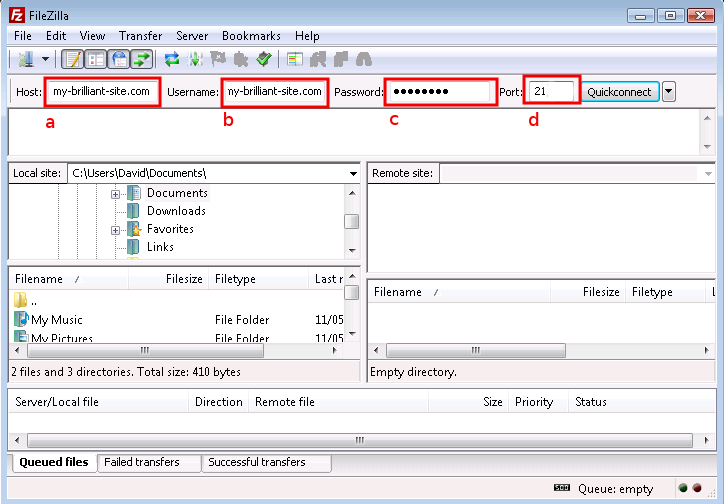
Once you connect you’ll notice that you only have access to directories beneath the
public/directory (here represented as "/") of themy-brilliant-site.com/directory tree, which is all you’d need if your role was limited to maintaining or setting up a web site.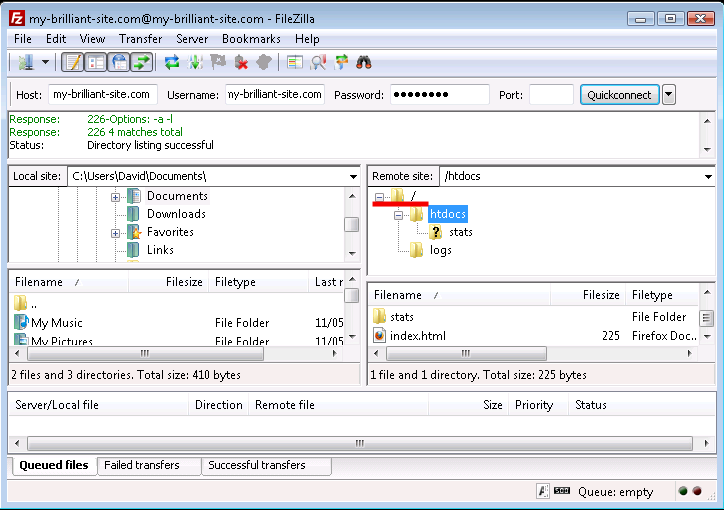
It is possible to limit the amout of data that can be kept in a domain’s
public/ directory using an FTP quota. This is done by creating a
file inside the domain’s config/ directory called ftp-quota.
Inside this file should be a number of bytes at which the quota is set.
The number can have a suffix of k, M, G, or T representing kilo-,
mega-, giga-, or terabytes respectively.
For example, to prevent the author of my-brilliant-site.com from putting more
than 150MB inside their public/ directory, create a file called
/srv/my-brilliant-site.com/config/ftp-quota with the contents 150M. This
will limit their space usage to 150,000,000 bytes.
Note
Please be aware that the FTP quota will include all log data from the
web-server in public/logs/, as well as the automatically
generated statistics in public/htdocs/stats/.